Merry Christmas 2017/Repairaganza!

Hope everyone has a very Merry Christmas/New Year for 2017!
Although I did not get as much done as I wanted
with EagleSoft Ltd this year (I took the year off to focus on my professional
video game development job), I plan to do a lot for the early next year. Since
the job started in January 2017, I have gotten a year's worth of valuable,
real-world professional experience in the video game industry. Both my résumé
and the portfolio sections of the EagleSoft Ltd website are quite outdated now,
and will be updated early next year as much as NDA allows me to, especially for
the professional projects.
There are also a few older, cancelled projects from a few years ago that I'd like to upload and document on the site, and I'm going to try finishing Socket the Hedgeduck hack next year. Those two older projects were a Super Mario 64 and F-Zero X ROM hack. A lot of work was put into the Socket the Hedgeduck hack, and I would love to do what it takes to polish it up to completion as a personal project. This ROM hack really helped me understand how the Sega Genesis hardware works, and was one of the projects that helped me get my professional video game development job. Other plans are to begin either a YouTube channel or Twitch channel called Nerdology, where I will review old video games and technology 😀.
There are also a few older, cancelled projects from a few years ago that I'd like to upload and document on the site, and I'm going to try finishing Socket the Hedgeduck hack next year. Those two older projects were a Super Mario 64 and F-Zero X ROM hack. A lot of work was put into the Socket the Hedgeduck hack, and I would love to do what it takes to polish it up to completion as a personal project. This ROM hack really helped me understand how the Sega Genesis hardware works, and was one of the projects that helped me get my professional video game development job. Other plans are to begin either a YouTube channel or Twitch channel called Nerdology, where I will review old video games and technology 😀.
Repairaganza 2017

On a different note, I recently received from someone a few old video game consoles and other video game memorabilia (including a custom arcade cabinet). Some of the consoles had some issues, and needed repair, while others were working and needed some cosmetic refurbishment. In a few previous posts, I repaired a Sega Game Gear and an awesome Sega Saturn, but recently received a few other consoles. I would like to use the rest of this post to detail the repairs in getting them fixed, for fun. These consoles will obviously be used when I begin reviewing video games for the Nerdology channel, coming next year!
Consoles:
- Nintendo
- Game Boy Color chassis
- GameCube
- Wii
- Custom piano SNES
- Misc.
- N64 Arcade Cabinet
- Sony
- Fat PS2
- Microsoft
- XBox 360
- Yerf-Dog
- Refurbished unit
Game Boy Color chassis replacement
One of the items received was a lime-green Game Boy Color Chassis. Although, back in the day, my parents gave me a lime-green Game Boy Color (which I still own), this unit cosmetically was trashed, especially for the screen. The screen got pretty badly scratched and scraped after loaning it out to a friend back in 4th grade, and the chassis edges got pretty badly dirtied by myself. (I owned it way back when I was younger, and, being younger, I did not take very good care of the handheld.) Now having a Tri-wing screwdriver and this older chassis, I figured it was finally time to restore its appearance, by transplanting the Game Boy Color motherboard to the new chassis.
Transplanting was easy, after following some iFixit guides for the front and back covers. The old chassis was somewhat dirty, and needed cleaning. Opening it up also gave me the chance to apply rubbing alcohol to the button pads, which I really found to help in maintenance of buttons for gamepads and such. I managed to transplant the motherboard without breaking anything.


Nintendo GameCube refurbishment/repair
Two other things I received were a working
(albeit dirty) Nintendo GameCube, and a Nintendo Wii. The Nintendo GameCube was
working, but sometimes the power button (which is spring loaded) would not
depress all the way to actually turn the console on. This was easily fixed by
removing the plastic button altogether; there's a hole there now where the
button can be manually depressed with a long, pointed object (such as a
screwdriver). It was quite dirty, and I had to open the GameCube up in order to
vacuum up the dirt/dust near the fan, by following this iFixit guide.
Unfortunately, I ended up damaging the GameCube
in the process of cleaning up the fan, by accidentally breaking off a lever for
the CD sensor switch when putting the top lid back on. Most CD-based game
consoles have a CD sensor switch; this is used to determine if the CD lid is
open (for top-loader based systems, such as the original PS1) or if the CD tray
is slid out all the way (for front-loader based systems, such as the fat,
original PS2). Most top-loader systems (such as the GameCube) have a piece of
plastic on the lid, which depresses a switch somehow. This switch is usually a
"normally-opened" (NO) type of switch. When this switch is closed,
the console knows that the CD lid is closed/tray is in; when the switch is
opened, the console knows that the CD lid is opened/tray is slid out. When the
switch is opened, the CD motor spindle is idle; when it is closed, the machine
begins spinning and reading the disc (since there should be one in there now).
The Nintendo GameCube uses a DPDT (Double-Pole, Double-Throw) type of switch,
using two lever switches. One of the levers got broken off.
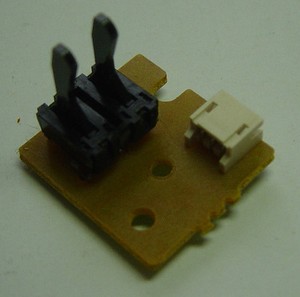
The circuit board for the Nintendo GameCube CD
sensor switch is about the size of a US quarter, and easy to replace (being a
modular PCB component). Rather than waste $6-$12 for the replacement part on
eBay (which seems excessively expensive for how simple the CD sensor switch
module is), I just soldered up an override switch on the CD sensor switch
module with a spare SPST switch to get around the broken switch. I could
technically use this sensor override switch to do a swap-trick if I really
wanted to do so. (The swap-trick is a method where the user puts in an
authentic disc into a game system, and quickly swaps out the authentic CD with
a bootleg copy at the right time. This is done with an override switch, in
order to fool the console that the CD lid is closed when it is actually opened physically,
and vice-versa when needed. If the swap-trick is done correctly and quickly
enough, the console will not know that the authentic CD was swapped, and will
use the authentication data from the authentic disc to boot the bootleg disc.
This is an especially useful technique to run bootlegs on security-based CD
consoles, such as the Sega Saturn, Sony PS1, and the Sony PS2. However, it is a
risky trick, and, if done incorrectly, the motor or console can be damaged.)
GameCube CD Sensor switch

Repaired GameCube 😎
The main reason for picking up this GameCube
(even though I also got a Wii, which is backwards compatible with GameCube
discs), is the fact that, unlike the Wii, only the GameCube is compatible with
the Game Boy Player add-on (which I have).
It is an awesome add-on for the GameCube, which allows the user to play
original Game Boy, Game Boy Color, and Game Boy Advanced games on a TV via the
GameCube. In the future, I plan on either installing an XenoGC modchip (which
allows the playing of mini DVD-R discs without the swap trick) or purchasing an
SD Media Launcher bundle for playing
homebrew on the console. The latter loader method contains a special GameCube
software disc (with the proper BCA area, so that it is read as an authentic
disc), which can launch homebrew from a special memory card which interfaces
with an SD card, as well as boot mini DVD-R backups. One homebrew I
would love try out is the Game Boy Interface, which is an
advanced Game Boy Player boot disc, which fixes all of the issues for the
original boot disc made by Nintendo for the add-on.
I also received with this GameCube a
turbo-enabled GameStop controller and a semi-rare GameCube Lodgenet controller. It was a
special controller that worked with a special Lodgenet GameCube model. This
GameCube model was used in Lodgenet hotels for a simple pay-to-play trial
system, and came with this special controller for using the system menu. The
special controller includes special buttons for the menu interface. The
controller uses a 6P6C RJ11 connection (instead of the standard GameCube
connector) with a super long telephone cord, and I plan to solder up an adapter
after doing some original research in the near future.
Stock image of a semi-rare
GameCube Lodgenet controller
Nintendo Wii repair/hacks
The Nintendo Wii I received was fully working,
other than the fact that the Wii disc drive mechanism was jammed. It also
lacked covers for the GameCube ports and the Memory Card slots, which will be
replaced later, and has the final firmware version for the model (4.3U). Unlike
most other CD-based consoles (which either use a top-loader system or a
front-loading tray), the Wii uses a disc slot. When you insert a disc, a simple
conveyor system "eats" the disc and spits it out as necessary
(similar in concept to VHS players of yore, or exactly like most automotive CD
audio systems). Unfortunately, the previous owner somehow got a copy of Mario
Kart Wii stuck in the system. After forcibly prying out the game out with
tweezers, I disassembled the Wii (using the iFixit guide at
https://www.ifixit.com/Guide/Nintendo+Wii+DVD+Drive+Replacement/5164), and
determined that some gears for the conveyor system got out of alignment, making
some nasty clicking noises. The gears were not catching, the conveyor system
would not run, and the disc could not be either sucked in or spitted out. I
tried watching and following this repair video, but the gear system was
too finicky/sensitive to repair. I plan just to throw out the old drive and
eventually purchasing a compatible, replacement drive on eBay.
To prepare for that replacement day, I surfed
over to the Wii Drive Chip DB website in order to
determine what type of DVD drive I had in the Wii during disassembly. The Wii
product line contained various different DVD drives during its
lifetime; some were cost reduced and had physical changes made to it in order
to make modchip installation more difficult. Earlier drives can play both
GameCube and Wii games, while later drives can only play Wii games. When
replacing a disk drive, it is a good idea to replace it with one containing the
correct drive chip. After inspecting the drive, I determined that it is a
full-sized DVD drive, with a D2B drive chip, with cut pins (harder to install
modchip), and no CD clip.

Wii Disc Drive identification
After determining the drive chip type, I
soft-modded my Wii with the Homebrew Channel, via Letterbomb
exploit 😎. I later installed some fun homebrew games and
applications (to tide me over until I replace the dead disc drive), and
modified the Weather Channel, News Channel, Wii Mail, and Everybody Votes
channel to work again online via the RiiConnect24 project. (News Channel is
throwing a FORE000006 error, so I have to reset the RTC clock). The coolest part
about this Wii was that the previous owner did not remove his/her Wii Shop
Channel account, and left 2250 Wii points for me 😀. Unfortunately, the Wii Shop Channel is closing in January
2019, so I am trying to get as many original WiiWare titles as possible and
enjoy them while they last. After the disc drive is replaced, I am going to
have a blast playing some games online again via the Wiimmfi project
and its patches.
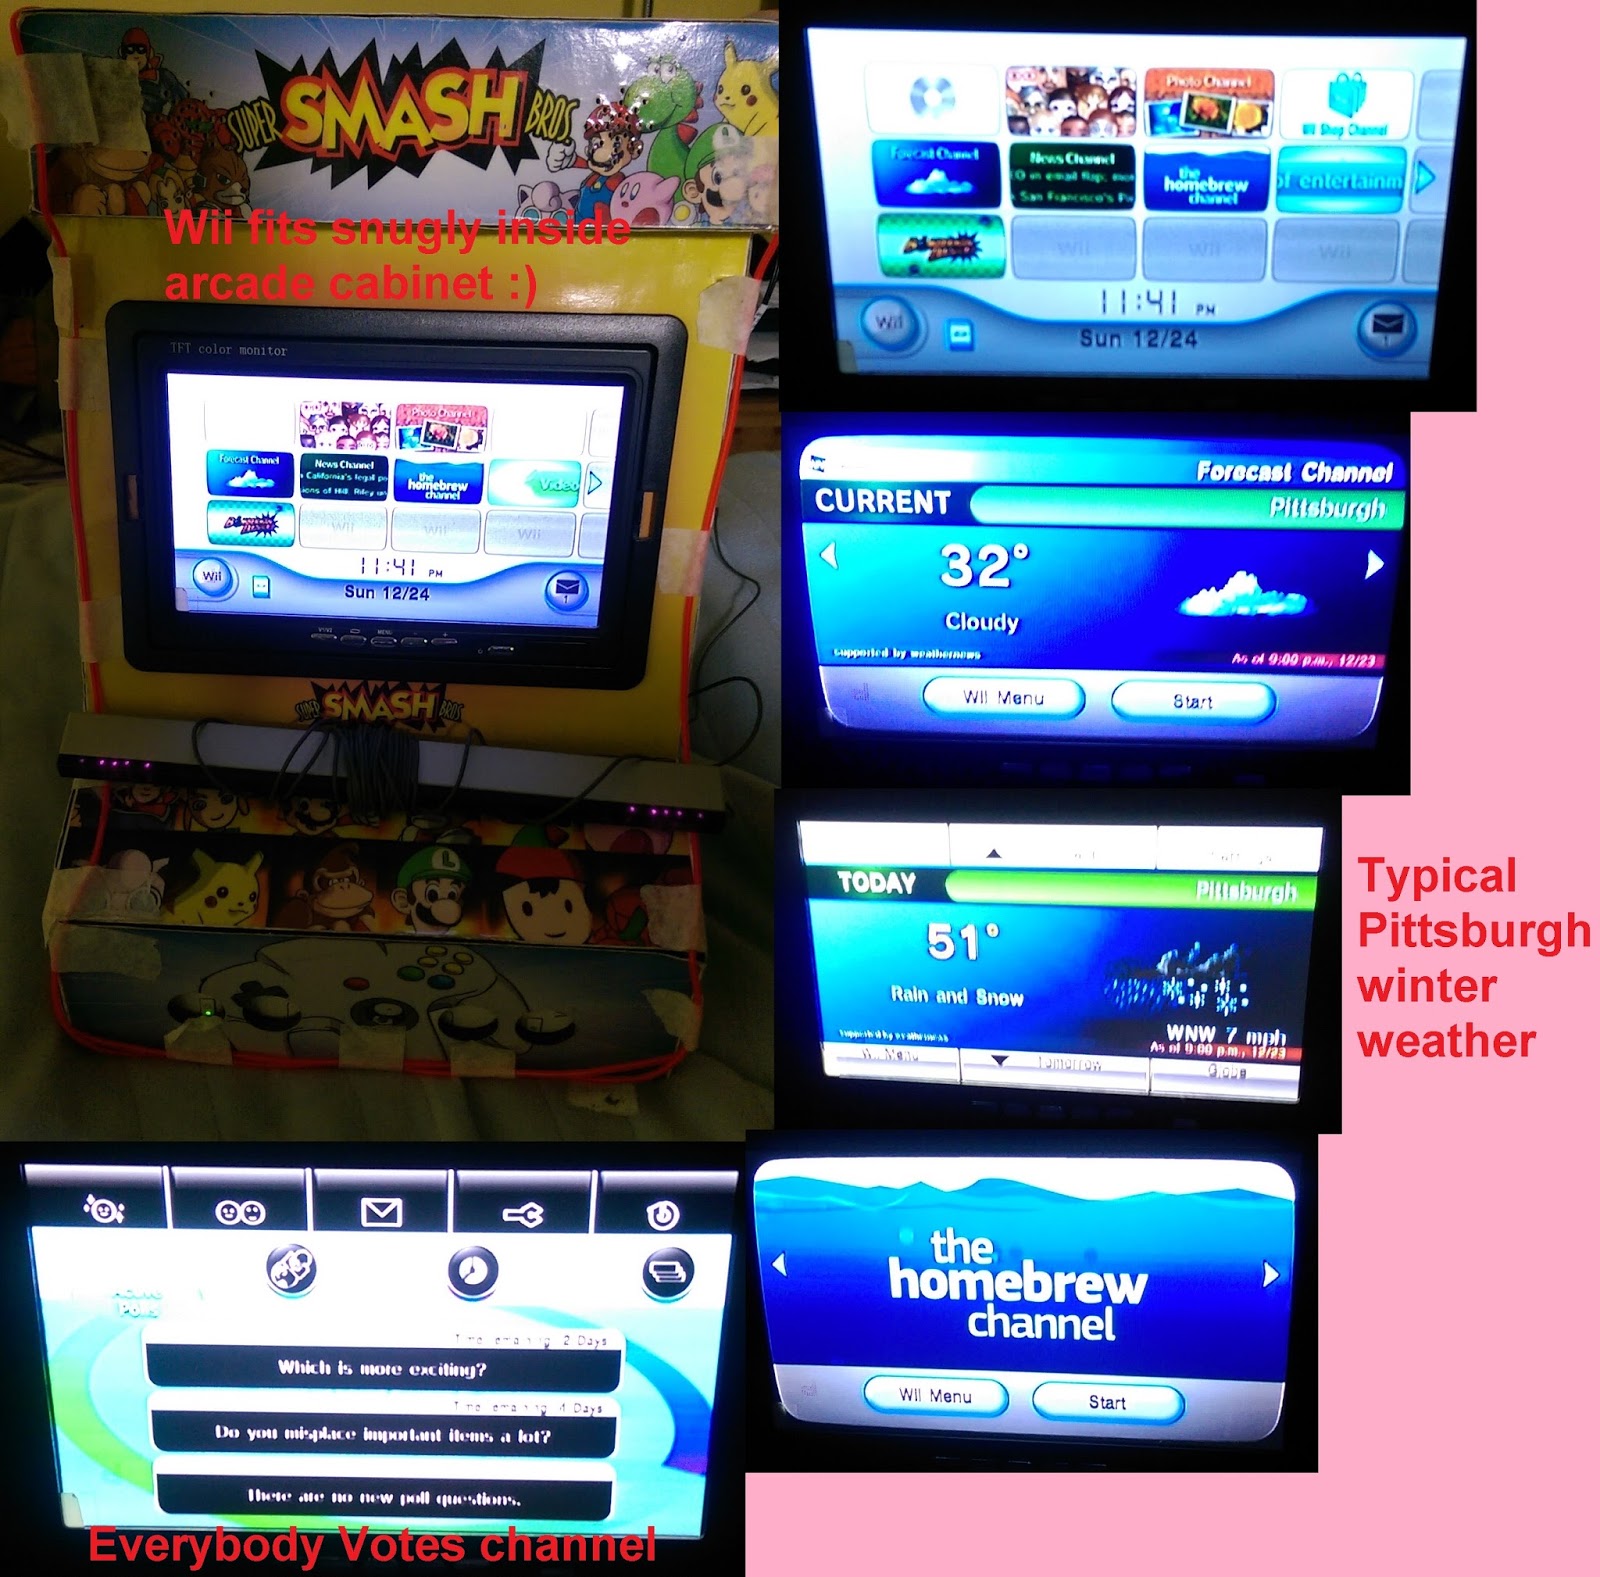
Wii hacked with HBC, RiiConnect24

Although the previous Wii owners broke the disc drive,
they left me with 2,250 Wii Points 😀
Custom piano SNES
From the same person as the other consoles, I
received a custom-painted Piano SNES that nobody wanted. (Poor SNES!) The unit
was not working at all; it would power up, but would never read cartridges.
Somebody I knew took a closer look at the unit with an
oscilloscope; turns out the CPU (a Ricoh 5A22) was reading garbage data when
cartridges were inserted, and he determined that the CPU was dead. He was able
to repair the unit by soldering in a working, replacement CPU. (I am quite glad
he repaired it; I do not have the hardware or skills yet to do surface mount
soldering, yikes!) It is a sexy console, and works well 😎.

Fat Sony PS2 repairs
I also received from this same person an older,
fat PS2, with a cool barbed wire skin on it. It is a SCPH-350001 model, with
relatively low versions on the system components, and the much sought-after Expansion Bay. Supposedly, it had
"Disc Read Errors," but I determined that it did not have such
issues. I was able to get it to read PS1, PS2 (Single Layer DVD 4GB discs), audio, and DVD
Video discs. I am assuming that the tester used a Dual Layer PS2 disc (such as
those in the TimeSplitters series), which have been known to have issues
with some models of fat PS2s without adjusting the laser potentiometers. I
remember having to do that and place transparent tape on the inner CD rings
(where the motor spindle attaches) to get TimeSplitters 1 to work on my older
brother's PS2 back in the day.
The fan was incredibly dirty, the unit had some
minor scuffs, and the CD tray sometimes would not open (it would jam). I
cleaned out the fan, washed off the scuffs as best as I could, and cleaned
off/lubricated the tray drive belt via rubbing alcohol, which improved the disc
tray sliding. Controller ports and Memory cards work on this unit too. (In
fact, this was the first unit that booted up a particular, old, blue, 8MB,
1st-party PS2 memory card I had in over 8 years! I thought this particular
memory card corrupted years ago to the point of being unreadable, yet it read
it!)
Eventually I plan to purchase a PS2 Network Adapter for the Expansion Bay, which can mount an
IDE HDD, for loading homebrew via FHDB and similar utilities.

Before cleaning the Fat PS2 up

During cleanup
(Look how dirty the cotton swabs
got when cleaning the fan; yuck!)

After cleanup
(So much cleaner!)
Video of disc drive before/after lubrication
Microsoft Xbox 360 repairs
In terms of consoles, lastly, I saved two XBox
360 Fat units from the person. Both had some minor scuffs and scratches which I
would clean off, and very dirty fans which I cleaned out. Both did not work
fully, and I was saving both because the other unit had the parts the other
lacked, and because I planned to hack one of the consoles (with RJTAG) for
homebrew and other features. One would be kept stock for XBox Live features,
while the other would be hacked and stay permanently offline (hacked consoles are
banned on XBox Live). One had a custom sticker on top ("Yerf-Dog"),
while the other one had a refurbishment sticker on it.
The former XBox 360 model was fully working,
other than a jammed CD drive, while the latter had an out-of-order wireless module.
The latter would not allow the connection of wireless XBox 360 controllers, and
would not display the state of the power button (the console would boot
however). Both have some of the latest firmware versions available (16k and 17k
versions), meaning I would have to hack one later with a complicated R-JTag
hardware hack. I was also allowed to keep a 60GB HDD, and both a Composite/S-Video
AV cable, and an HD Component AV cable (with SD/HDTV toggle button). While
repairing them, I identified the processor type and other specs from this guide, so I could determine which
XBox 360 would be better to hack.
I repaired the jammed DVD Drive in the Yerf-Dog
model by following this guide and disassembling the DVD Drive. Inside was a belt
drive, which I cleaned out and lubricated with rubbing alcohol. This made the
drive slide smoother and open up properly. This unit was identified with the
following:
Yerf-Dog model
- CPU
- 2009 Jasper CPU
- Firmware
- Version 17000 dash (Metro Dash)
- DVD Drive
- Model type: Liteon
- MS Part no : X800474-009
- MFR Date: July 2009
- HW Ver: A0A2
- FM Ver: 83850C
- 256MB Internal Memory Unit


For the other model (the refurbished one), I was
able to fix the wireless module by properly connecting the module; it was
loose. This XBox 360 was cleaner than the other was, and I identified it with
the following specs:
Refurbished model:
- CPU
- 2007 Falcon CPU
- Firmware
- Version 16000 dash (Metro Dash)
- DVD Drive
- Model type: Liteon
- MS Part no : X800474-009
- MFR Date: July 2009
- HW Ver: A0A2
- FM Ver: 83850C
- Epoxied drive chip!
- No Internal Memory Unit

After repairing both units, it was determined
that the refurbished model would be the better one to hack. It has an older
firmware, and a Falcon processor (better R-JTag results). My only concern is
the epoxied drive chip on this model.
N64 Arcade Cabinet


Since the N64 was dead, I removed the N64 and
de-spliced the N64 power brick from the common power supply. Some of the wires
running from the HiFi system to the speaker broke off, so I repaired them by
soldering them back onto the speakers. I mounted the HiFi system to the side
panel, and mounted the common power brick onto the other side panel. This
allows both the HiFi system and power brick to be encompassed into the cabinet
design, to make the whole thing portable. I replaced the old LCD monitor with a
newer one, which has two RCA video inputs, as well as a VGA input port. Lastly,
I pimped the unit up by tracing the cabinet borders with cool, red EL wire.
Using a battery powered EL wire inverter, the whole cabinet lights up 😎.


Overall, I picked up and fixed a a lot of old consoles, accessories, and a cool custom arcade cabinet. Next year is going to be more active for EagleSoft Ltd, with an updated porfolio website and even a YouTube/Twitch streaming channel called Nerdology, where I'll review old video games/consoles 😀.
-Tamkis