Showing posts with label Retro Computing. Show all posts

Building a DIY PC External Drive Bay Module

Building a DIY PC External Drive Bay Module


Building your own desktop gaming PCs

    Building your own desktop PC in a tower case can be quite fun! You can customize the PC build and specs to your own liking, with your own motherboard, RAM, PCI(e) slot devices, drive bay modules (5.25" and 3.5"), and specialized devices. By purchasing or thrifting for used PC parts you can also save much money rather than buying a pre-built consumer gaming PC.


My Windows PCs

  My Windows computing environment at EagleSoft Ltd. consists of 3 computers:

  • Windows 11 Gaming computer (Big Eagle 🦅)
    • Asus M5A78L-M/USB3 motherboard
    • Thermaltake Versa N21 desktop case
    • Meant for modern 4K, VR, video gaming, and game development

  • Windows 7 Laptop (American Kestral) 
    • HP EliteBook 8570w
    • Daily driver computer
    • Mobile workstation laptop for on-the-go power computing

  • Retro DOSBox Computer Build (Millenium Eagle)
    • Asus K8VSEDX Motherboard
    • Thermaltake Xaser III desktop case
    • Multi-boot retro PC
      • Windows XP
      • Windows ME and encapsulated vintage operating systems
        • Pure Mode DOS (Windows 98 hack)
        • Windows 3.11 WfWG
    • OPL3 FM-synth Sound Blaster clone card
    • Many other goodies


More about my Millenium Eagle retro gaming DOSBox PC


   The Millenium Eagle computer build is meant for running vintage video games and software. It also handles vintage media formats and runs on a multi-boot setup consisting of Windows XP, Windows ME, Pure Mode DOS, and Windows 3.11 WfWG. The computer is useful for using vintage serial/parallel port devices and creating FM synthesis audio using a OPL3 FM-synth Sound Blaster clone card.


   Over the years while thrifting I found other 5.25"and 3.5" drive bay devices, and unfortunately ran out of space for other drive bay devices in the desktop case. A big feature of the build was the ability to handle various vintage media formats for reading, writing, and ripping. Back in the day, you could readily find external 5.25" drive bay modules for about $100. These external drive bay modules were quality, and either made out of steel/metal or professional plastic. However, nowadays most desktops lack 5.25" bays due to becoming obsolete, and thus these external modules are no longer produced. NOS external bays are hard to come by and are expensive.


   Due to these issues, I decided to build my own DIY PC external drive bay module and interface for the other drive bay devices. This project was built by 3D printing x2 5.25" 3-bay modules and some adapters, installing some USB hub devices, installing extension cables, and installing mounting hardware screws/double sided tape where necessary.


Example of external drive bay modules
from ancient times


Drive bay modules (main Thermaltake Xaser III case):

  • 5.25"
    • Proprietary Thermaltake Xaser III fan speed control module
    • Sony CRX230A 52x32x52x Internal EIDE CD-RW Drive
    • Samsung SH-S182M DVD Drive (Pandora variant)
    • Safronic DS-53A 5.25" Floppy Disc Drive
      • Todo: Verify if drive works, install and inteface correctly into computer for the OSes
      • May replace with TEAC FD-55GFR-149-U5 from my spare parts storage if not working
      • Future blog post!
  • 3.5"
    • Sabrent 75-in-1 Multi Flash Media Card Reader/Writer (CRW-UINB)
    • 3.5" Floppy Disk Drive


 Drive bay modules (PC External case):

  • Xbox 360 HD-DVD drive
    • Mini USB/barrel jack power
    • Set on top of the external drive bay case
    • Can read/rip HD-DVDs

  • CD Home (1 x 10 ea) CD caddy holder

  • * Sony NetMD Walkman MZ-NF610
    • * With 3.5" to 5.25" drive bay adapter
    • Mini-USB NetMD Mini Disc player (read/write)
    • Compatible with WebMiniDisc Pro (utility, guide) and homebrew hacks (list of compatible devices, for S-Type exploits)
    • Supports S-Type homebrew exploits like ripping audio directly from MiniDiscs!

  • * Iomega Zip 750 USB drive (Z750USB)
    • * With Mayflash drive bay adapter 
    • Iomega Zip Disk Drive (750MB) / USB interface + barrel jack power
    • Reads/Writes 750MB and 250MB Zip Disks
    • Reads 100MB Zip Disks only

  • * Mayflash GameCube Controller Adapter (USB, W012)
    • * With Mayflash drive bay adapter  
    • 4 Port GameCube controller adapter module
    • Compatible with Wii U, PC USB, and Nintendo Switch (2)
    • Uses x2 male USB plugs (1 USB power + 1 USB Data)

  • Lite-On iHAS524 24X Internal DVD Writer with LabelTag
  • BTO PlusDeck 2C


Building the DIY PC External Drive Bay Module

Supplies:

  • Hardware tools
    • 3D printer, slicer software, and filament
  • 3D printed bays and adapters
  • Electronics/cables
    • x3 4-Port USB Hub With LED Indicators (Five Below)
    • 4-pin power molex extension cable (eBay)
    • 4-pin power molex splitter cable (male to x2 female, eBay)
    • 4-pin power molex to SATA-power (male molex to female SATA 15-pin, eBay)
    • SATA-data extension cable (female to female, eBay)
    • IDC20 (2x10) Female to Female 2.54mm-pitch extension ribbon cable (eBay)
    • Extension cable (x3 2-prong plugs)

  • Hardware
    • M3x0.5mm 6mm screws (eBay)
      • Tom's hardware recommends
        • M3x0.5mm screws for mounting 5.25"/3.5m" drive bay devices
        • #6-32 screws for 5.25"/3.5" HDD drives
    • Double-sided tape


Five Below USB hubs
 

Molex power extension cable 
 
Molex power splitter cable
 

Molex male power to 15-pin female SATA power adapter cable
 
SATA data extension cable (female-to-female)


IDC20 2.4mm pitch extension cable (female-to-female)


100 pcs pack of Torx screws M3x0.5mm 6mm
 
   Assembly of the DIY PC external drive bay module was pretty easy. After 3D printing the aforementioned drive bays and adapters, I used double-sided tape to tape both 3-bay modules together (to sandwich them). I put the Xbox 360 HD-DVD drive on top of the whole external drive bay module assembly. The CD Home, 3.5" bay adapter, LabelTag DVD drive, and Plusdeck 2C devices were inserted and screwed in using the M3 torx screws. The Mayflash drive adapter for both the MiniDisc player and Mayflash Gamecube adapters were inserted, and taped down using double-sided tape. Both the MiniDisc and Gamecube devices were put into the drive bay adapters.
 
   The x3 USB hubs were taped onto the side of the external drive bay assembly. The USB Type A outputs of two of the hubs were daisy-chained, while the last one was plugged directly into a free USB Type A port on the computer, to connect all of the devices. The 2 DC barrel jack power supplies (for the Xbox 360 HD-DVD drive, and the Iomega Zip 750MB drive) were plugged into the power extension cable. The molex extension cable was plugged into the motherboard, extended outside from the case, and plugged into the molex splitter cable. One end of the splitter cable went to the Plusdeck 2C for power, while the other end plugged into a molex to15-pin SATA power cable on the LabelTag DVD drive. Finally, the SATA data extension cable was plugged into the motherboard, extended outside of the case, and plugged into the SATA data port of the LabelTag DVD drive.


  Thanks to the power of 3D printing, extension cables, and ingenuity, I could finally create my own DIY PC external drive bay module and extend the amount of 5.25" drive bay devices I have for my vintage gaming PC, the
Millenium Eagle 🦅! 
 
The PC can now handle:
  • CD-ROM and CD±R(W) (Read/write)
  • DVD-ROM, DVD±R(W) (DL), and Lightscribe (Read/write)
  • 5.25" Floppy Discs (soon™ when I get it working)
  • 75 types of card-based flash media
  • 3.5" Floppy Discs
  • HD-DVD (Read)
  • MiniDisc (read/write and rip)
  • Iomega Zip (r/w 750MB and 250MB discs, read 100MB)
  • Use 4x Gamecube controllers
  • Write LabelTag DVD discs
  • Read/rip audo cassettes

That's what I call a multimedia vintage PC! 

-MrTamkis ðŸ¦…

DreamPi: DIY Industrial LVI

DreamPi: DIY Industrial LVI


    In a few prior posts, I have detailed some information about getting a Sega Dreamcast back online by using a DreamPi. A DreamPi is a standardized set of software (a customized Linux distro) and a set of hardware created by a fellow named "Kazade" which will create a simplified DC-PC server, for getting a Dreamcast back online to connect to the Internet for browsing and online gaming, via resurrected, private game servers. In a few other posts I have also detailed using and writing a customized DreamPi NOOBS-compatible image that I have created for adding the DreamPi Linux distro onto an SD card in a mulit-boot setup (via NOOBS/PINN bootloader).

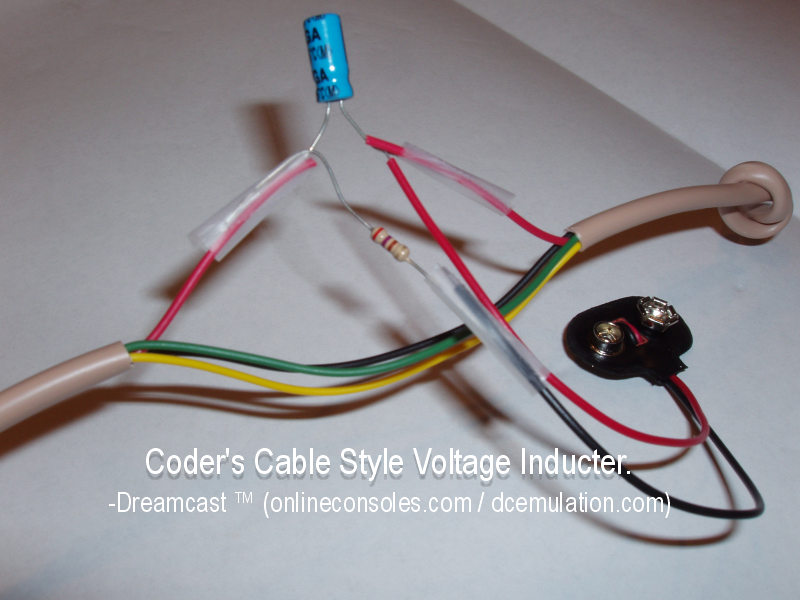
   One of the main hardware components that is often required for setting up a DreamPi is a Line  Voltage Inducer. Most of the dial-up 56k modems models built into most Dreamcast models require voltage on the red wire (+power line) of the RJ11 phone cable; a Line Voltage Inducer (LVI) is a simple circuit, consisting of an electrolytic capacitor, a resistor, and a 9V battery, which will apply the proper voltage to the red wire (+power line) of the RJ11 phone lack for proper operation of the Dreamcast's dial-up 56k modem.
 
Simple depiction of an LVI
(Not electrically functional just depiction, duh.
Pic credited to onlineconsoles.com)

  Although fellow DC scener PCWizard does sell both awesome, Linux-compatible USB RJ11 modems for DreamPis and even complete DreamPi kits at the Dreamcast Live shop, when I built my DreamPi back in January 2018, I built my own kit from scratch, by shopping for the components on eBay and making my own DIY LVI. (If you are not technical, if you would just want to have a simple complete kit, and if you have the money, I do recommend buying from the Dreamcast Live shop in order to support both DC Live and the scene.) Making my own DIY kit was done both to save money and for the fun/learning factor; if I remember correctly, I gathered everything for about $50, so I saved some money. (In comparison, at the time of this writing, a complete Standard DreamPi kit from the Dreamcast Live site is USD $79.99, and a Raspberry Pi 3 DreamPi Kit with WiFi support is $99.99 . My DreamPi consists of a used Raspberry Pi Model 2B kit from eBay, which uses an Ethernet connection for the internet. I saved a little more money since I already had spare components available for assembling the DIY LVI.) For the DIY LVI, I just cut open a spare RJ11 cable in half, and soldered the LVI circuit in between the halves on a spare RadioShack prototype PCB. (RIP brick and mortar RadioShack stores, you are still greatly missed in 2019 😢.)

   At a previous job many years ago, I once had a summer job doing some contract EET work of wiring up some safety-related electrical equipment, which was my highest payable job to date (my High Score) of a whopping $20/hr. The main task of the job was cutting open RJ45 Ethernet cable, twisting certain pin pairs of the cable, crimping the pairs into spade terminals, and inserting the spade terminals into screw terminals of the safety devices, in order to wire up a Modbus protocol cable for the devices. Since that job, I have disliked dealing with RJ45/RJ11 cable, due to how difficult stripping, splicing, and dealing with the small gauge of this stranded wire was.

    Like with the old job, one problem I found with creating that LVI (which I will now call "LVI 1.0" throughout the article) was that it was flimsy and hard to solder down. Some soldering wizards just make their own DIY LVI by soldering the circuit components directly between RJ11 wires (no PCB used, like with the simple LVI depiction above); I find doing soldering in between wires like that very difficult. Standard RJ11 wire is both very small gauge wire (either 22 or 24 AWG gauge wire, with 24 being the standard) and is usually stranded (the wire itself has various strands, must be twisted together for easy soldering, and soldered down properly as a whole for stable electrical conductivity). After some attempts, for LVI v1.0, I soldered down the RJ11 wire onto the board, and had to apply some electrical glue to prevent strain on the fragile, soldered RJ11 wire as the ends moved. Despite this, however, some of the RJ11 wires soldered down still would sometimes break off from the PCB, and I would have to redo the soldering for the affected wires. It was annoying.


LVI v1.0

  A few months ago, after repairing and breaking the circuit for a 2nd time, I decided enough was enough, and to design a solderless, industrial-strength LVI. Instead of even soldering and dealing with the small, fragile, stranded gauge of wire that is RJ11 wire, I designed a better LVI (LVI v2.0). LVI 2.0 is a far more stable design, consisting of x2 4P4C RJ11 wall plates (which utilize user-friendly screws and wire terminals for each pin), a breadboard for the LVI circuitry itself; shorter, replacement plate screws and washers; and small gauge, solid-core, copper wire and 22-16 spade terminals to connect both RJ11 wall plates together and to wire up the red wire (power+ pin) to the mini breadboard with the LVI circuity. To wrap up the industrial-strength LVI, it is all enclosed in a fancy metal box, with the wall plates screwed into the top lid and bottom case (with washers), and cuts to insert the RJ11 keystones.

  The whole thing cost ~<USD $15 if I remember correctly, and was pain-free to create (compared to dealing with that pesky RJ11 24 AWG gauge wire).

Parts/approx. cost:
  • Metal box
    • Acquired on sale from a Pat Catan's closing sale
      • Pat Catan's was a local craft store, which also went RIP like RadioShack earlier this fall 😢.
      • It's inventory and business has since been absorbed into Michael's another local Craft store
    • Equivalent box from Michael's
  • RJ11 keystone wall plates
    • Steal of $0.50 each from a Pittsburgh Goodwill store 😀
  • Box of 20 22-16 Spade Terminals


  • Shorter RJ11 plate screws and washers for about $2 total both from Lowe's
    • Shorter screws needed because screws that came with plates were too long to fit into box
    • Washers needed to clamp down wall plates to metal box halves
  • LVI Circuitry
    • 1μF electrolytic capacitor
    • 390Ω resistor
    • 9V battery terminal
    • Some from either RadioShack or from part grab-bags elsewhere online
  • Mini breadboard
    • $4 for pack of 6 from Frentaly (eBay)
    • Not depicted/used yet; to be bought later
    • Temporarily using a small segment from my main breadboard (which currently has a prototype Sony Super Multi circuit on it)
  • Edit - 11/2/2020
     Assembly was easy; just measure and Dremel out holes for the RJ11 wall plates, drill out holes for the plate screws, screw in the plates (with washers inside the box), and then assemble solid-core, copper, jumper wires for wiring up everything. And also drill out M3 metric holes for the standoff leges, screw them in (11/2/2020 edit). The drilled screw holes and the square cuts for the keystones were filed down (they were too sharp initially). Each jumper wire was cut and stripped, and spade terminals applied to the ends as needed. The black, yellow, and green RJ11 pins between both wall jacks were respectively connected by screwing the spade terminals jumper wires between them (direct connection), while the red pins (power+) from each plate was connected via spade terminal and into a small breadboard (bare solid wire). This breadboard contains the LVI circuity itself for applying the voltage.
   And voila, a high quality, industrial-strength LVI was created! This LVI has served to be much more sturdier than v1.0, and has been working flawlessly since. Never again do I have to deal with that pesky RJ11 wire for tweaking. Pictures below of the industrial-strength LVI masterpiece.

Entire DreamPi setup
(excuse the mess, semi-temporary living quarters)
Raspberry Pi

Sega Dreamcast

Industrial Strength LVI
LVI Circuit (on temporary breadboard)
LVI Setup


Connecting to the internet with DreamPi
and Industrial-strength LVI
(DreamPi distro output,
Quake 3 Arena,
PlanetWeb connecting to EagleSoft Ltd.)

12/16/19 Update!
Finally ordered and finished the Industrial LVI
with a dedicated mini breadboard.
Enclosure can now close shut!


11/2/2020 Update!

Drilled M3 metric holes on bottom, in order to mount PCB Legs to the bottom of the case.
This makes connection of RJ11 cables easier.


    EagleSoft Ltd. and Labs has been kinda quiet lately, but behind the scenes, I have been working on a new ROM hack (a Knuckles Chaotix hack for the almighty Sega 32x), and EagleSoft Ltd's first self-published, commercial, Unity3D/C# Indie video game, titled StarEagle: Defenders of the Galaxy. More details about both games in the next 2 blog posts.

   Also, that repair of getting that Sega Model Virtua Fighter arcade board is still ongoing (saving up money to gather parts needed), and also a blog post about getting that awesome NeXT Cube boot up coming soon (also saving up money for parts).

Stay tuned for those upcoming blog posts and game announcements!


Copyright EagleSoft Ltd. Powered by Blogger.