Sonic CD Breakout, Demo #2, RELEASED!

1 comment
Ho ho ho! Finally! It's here, DEMO #2 of Sonic CD Breakout, just in time for Christmas 2013!


      Due to SAGE (Sonic Amateur Games Expo) 2013 not happening this year, and due to lack of leisure time recently for working on this due to real world things like college, I decided that I should release a demo instead of just sitting on the game. Don't know what Sonic CD Breakout is? It's a Sonic fan game, which is a Sonic CD themed breakout clone, using the BreakGOLD game engine. For more information about the fan game project, see this page. The latest demo can always be downloaded from that page. READ the readme in order to learn how to install the game, because some "assembly" is required.

I am hoping to get a third demo made for Act 1 of SAGE 2014; if not by then, then for Act 2 of SAGE 2014.

Demo #2 Release Video

Enjoy!
(Want to comment on this YouTube video? Do so here, at this blog post!)

Sonic CD Breakout

Leave a Comment

What is Sonic CD Breakout?

Sonic CD Breakout is a PC fan game developed by me. It is a level set for an old breakout game called Break GOLD!, by Kjell Anderson. The game utilizes a Frankenstein of an Motorola 68k virtual machine and M68k scripts to make things work, and the author created a Level editor for the game, which is included with the full-version of the game. The Sonic CD Breakout level set is, obviously, themed around Sonic CD, a Sonic game made for an add-on for the Sega Genesis known as the Sega CD. It is a fan game which I started over summer 2009, but have worked on sporadically due to high school and now college life. Still, it is a fan game which I am quickly trying to finish. In future posts, I will document and give announcements about its development.
Metal Sonic race, from Sonic CD
Vanilla BreakGOLD Engine
  
A Model 2 Sega CD unit

How to Disassemble the Atari XF551 5.25" Floppy Drive

1 comment
   When I bought my used Atari 130XE 8-bit computer that I found at a Goodwill store during August 2013, I purchased the whole $40.00 lot/bucket of supplies, which included power cables, SIO cables, and even two Atari XF551 Floppy Disc Drives. Due to my intensive coursework and studies at the University, I have not had much leisure time at the dorm. This intense first college semester at the new, 4-year college ends in 2 weeks, so things will be getting more stressful and intense as the semester comes to its end, and all online shenanigans of mine will grind to a halt next week.


An Atari 130XE computer

      Recently, however, I had some leisure time, especially since I am currently on thanksgiving break for this week, at the time of this writing. One of the things I decided to do with this leisure time was to dissassemble one of my XF551 FDDs. Why did I decide to do this? For two reasons. One reason was to wash out the dust, dirt, and other gunk from the inside and outside of the FDD chassis, and to check if the circuity is physically okay. Another reason was to check if the EEPROM chip of either or both of the two FDDs was socketed or not.

    Later on in 2014, I plan on purchasing an updated firmware chip for the XF551. I have read online on several Atari forums that what the eBay user is selling is indeed legit, especially since he is well known for these firmware chip updates for Atari and older computers. He sells these chips usually 10 at a time, and he sells them in bulk. Bascially, what the new firmware chip does is, after mounting an off-the-shelf, old, internal, 3.25" FDD to the XF551 PCB, is convert the old XF551 FDD, which can only accept ancient 5.25" floppies, to now accept up to 720kb 3.25" floppies (the "modern" common ones)! The 5.25" floppies are the ancient ones which actually flop, by the way. By using existing Windows PC software, such as WriteAtr by Hiasoft, with a USB FDD, this conversion will allow me to write Atari games to common 3.5" floppies, and then begin rapid homebrew development on actual Atari 8-bit hardware! This documentation of the original mod, called the XF351 kit, was written up in an old Atari magazine. Swapping out the chips is much easier to do if the FDD has the firmware chip already socketed (not all units do). I plan on only converting one of the FDDs; the other one will remain stock, in order to accept original 5.25" floppy discs. I still have yet to determine if these drives work.


An XF551 unit

   Anyhow, let's get to business, and I'll show you how to dissassemble and on how to clean a XF551 FDD! I'll eventually record a video walkthrough of how to do this, when I'll dismantle and check out the 2nd FDD. Please excuse the poor picture quality; blame my low quality camera. I used a pen and a screwdriver in the photos in order to point out the screws that need to be removed.

Tools you will need:
  • For physical disassembly
    • Phillips-head screwdrivers, especially long, small ones
    • Piece of paper
    • Pen
  • For cleaning the drive
    • Towel
    • Hair Dryer
    • WD-40
    • Cotton Swabs
1. Optionally, on the piece of paper, draw 3 small circles. For organizational purposes, you may place the appropriate screws in the circles. Label them "Outer Chassis Frame", "Floppy Mech Frame", and "PCB Frame".


2. Turn over the FDD onto its bottom, and, with the screwdrivers, remove the 4 screws on the bottom. Place these 4 screws in the "Outer Chasis Frame" circle on your paper.


3. Then, carefully, turn over the FDD, so that the top is indeed facing upwards. Then, slowly, remove the upper half of the chassis.

4. Once open, you will find two parts: the metalic 5.25" FDD mechanism, and the PCB controller circuit. On the FDD mech, remove the the four screws on the perimeter on the frame, which are flushed to the bottom half of the chassis. Place these screws in the "Floppy Mech Frame" circle on the paper.


5. Carefully remove the white power cable from its socket.


 6. Slowly and carefully, lift the FDD Mech off the chassis, and onto the side outside of the chassis frame. Be careful, beacause the FDD Mech is still attached to the ribbon cable-like thing!


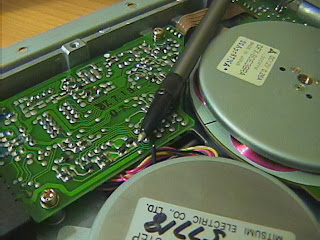
7. Remove the three screws from the controller PCB, and place them on the paper in the circle marked "PCB Frame". (See photos)


(There is a screw inside that hole on the metal frame)

8. Carefully, pull the board away from the back side of the bottom of the chassis, and pull the board up. You need to get the SIO connectors out of the chassis cutout, and the PCB board above the white plastic holders. This takes some time...

(White plastic holders are at tip of pens)


 9. In the bottom left corner of the PCB board, notice the firmware chip and PCB revision text. Note whether the firmware chip is socketed or not (mine is). Also write down on the piece of paper the text on the chip and the Board/Revision number of the PCB. You will need this information later for reference, if you actually decide to do the XF351 upgrade.


10. Inspect the solder joints on both the PCB and on the FDD Mech. Especially check the wire solder joints on the FDD Mech, and the solder joints on on the connectors on the back of the FDD, especially the power jack. Remember, unless you got your FDDs NIB, these FDDs are more than 20 years old, so things shall have worn out! If you are skilled enough (and I am assuming that you are, since you are reading this electronics-based retro guide), add new solder to joints that need them. Also, optionally, lightly and carefully, apply WD-40 to rusty spots on the chassis of the FDD Mech.


(Gosh, looks like that black wire broke off of its solder joint, on the bottom of the FDD Mech! I need to eventually resolder it, if it is not some kind of ground wire. This particular FDD unit kept giving me boot errors, even before I opened it up. This broken wire is probably the cause...)


(The metal on the power jack looks rusty. I need to apply eventually some WD-40)
(Looks like the solder joints on the bottom of the switch and power jack need new solder too...)


(Oxidation! Apply WD-40 lightly!)

11. Take the plastic chassis halves to a sink. Run lukewarm water from the sink's faucet, and quickly but thoroughly clean off the dust, rust, and other mess from the two chassis halves. Also, lightly wet the "air vents" on the top of the chassis. Afterwards, wipe the majority of the reamining water with a towel. Finally, wipe the rest of the water using a cotton swab, and some of it quickly using a hair dryer on warm. Let everything air drive after you are done. Remember, the plastics are more than 20 years old, so do not apply too much heat; it could crack!


12. Do whatever else you want to do (ie, the XF351 upgrade), and then reassemble everything, in reverse order!

===========

   I hope you liked the guide and find it useful. Soon, I will be trying to do that XF351 conversion after purchasing the upgraded firmware chip, as well as diassembling/cleaning out the 2nd FDD. I will post a video walkthrough on when removing the 2nd unit.

The ALT method of entering UNICODE characters

Leave a Comment
Author's Note: The following article uses Microsoft Word 2003, the Windows 7 version of Calc.exe, and the Windows 7 version of Character Map.

   Picture it. You are typing a very technical, mathematics Word document for a college paper, using the standard ASCII characters which are readily available on your standard keyboard. But wait! What you just typed required an extended IBM ASCII character, say, the greek lowercase letter, θ, which obviously is not on your keyboard. Oh, great! What to do now?


    At this point, the user will probably, with much effort, drag his mouse to Insert>Symbol, and then hunt through the character map matrix containing the entire set of 3,000+ UNICODE characters. After inserting the character into the document, he will probably copy and paste the new character for all of the future times he will need it in the document. Either way, constantly going into the Symbol dialog box or constantly copying and pasting the special characters that he needs will waste precious time. Is there is a more productive, efficient way for directly entering any ASCII or UNICODE character quickly?


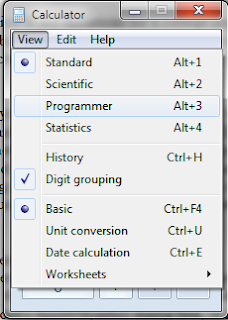
   Yes, there is a more productive, efficient way for entering special characters, using what I call the <ALT>+Dec method! The <ALT>+Dec method of entering special characters involves having the Num Lock key off, holding down the <ALT> key, and then pressing a 4-digit decimal code in the number pad for the appropriate character. In either Word's Insert>Symbol dialog box, or in the global Character Map Windows application, the user can view the unicode characters available for the user's specified font. In the status bar of either the stand-alone application or Word's Symbol dialog box, a 4-digit $hexadecimal value will be displayed. Due to the <ALT>+Dec method requiring decimal inputs, the user will need to convert the $Hexadecimal value into decimal. The quickest way to do this is to open up the Windows' Calculator app, set the calculator type to "Programmer", enter the hexadecimal value in "Hex" mode, and then switch to "Dec" mode, in order to convert the value. Lastly, press <ALT>+4-digit decimal value in order to insert the special character!


   What is unique about the <ALT> method of character input is that it is a global Windows feature. This feature should work in most applications that can utilize standard text input methods; however, whether or not the application will accept the special characters will vary. (For example, notepad does not like higher UNICODE characters.) By the user memorizing the decimal codes of the common special characters that he uses, the <ALT> method will save him time in typing technical documents. Also, if you want to quickly find the UNICODE hexadecimal equivalent of a text character within Word only, you can press <ALT>+X, in order to reverse the character into a hex string :).

How to copy file paths

Leave a Comment
       The Windows Explorer application built into Windows 7 is a very powerful, file managing tool. With the ability to easily copy, move, edit, and manage thousands of file, this program is an essential component of all of the Windows OSes. Sometimes, the user may need to copy the file paths and names of a list of files. How does one do this easily?

How to copy file paths:

     One easy, but little known, way to do this is by shift clicking a list of files. The difference between ctrl clicking a list of files and shift clicking a list of files is that the user will have to individually click all of the files he wants to select. With shift-clicking, however, all of the files listed in between two files will be selected. After pressing ctrl, and then shift-clicking said file range, right click, and a a new context menu titled "Copy as path" will appear in the shortcut list. Click the context menu item, and then paste the clipboard contents into your favorite text editor! It's that simple!


Welcome to EagleSoft Labs!

Leave a Comment
Welcome to my new blog, EagleSoft Labs! Some of you may know me as "Tamkis", the owner of EagleSoft Ltd and from my YouTube channel, MrTamk1s. I am currently attending Robert Morris University in Pittsburgh, PA, in order to pursue a B.S. in software engineering as a transfer student :) . Over the years, I have created dozens of unique software for various computers and devices, including PC, the Ti-83/84 graphing calculators, the Sega Genesis and Sega CD, and others. I am currently trying to expand to other platforms. This new blog aims to be the "sister site" of EagleSoft Limited, where I will regularly post progress on my software development. I will also be reviewing software and posting other interesting, useful PC information. I will also be regularly posting about retro video gaming pickups, computer programming tips, retro video gaming stuff, and perhaps life at Robert Morris University.

As this blog is quite new, and as I am new at using the Blogger platform, please allow me some time to solidify topics, content, and organization of the blog. Be sure to come back when I have more content, and to subscribe as a follower of this blog. I could really use comments and some kind of "audience", so at least I do not feel like I am wasting my time blogging in a void...

--Thanks!
--Tamkis
Copyright EagleSoft Ltd. Powered by Blogger.