Showing posts with label Linux. Show all posts

XBandPi NOOBS Compatible image released! (v1.23/v1.7 DLE)


XB∀NDPi NOOBS
Compatible image released!
(v1.23/v1.7 DLE)


DreamPi DX NOOBS-compatible image updated! (v1.22/v1.7 DLE)

DreamPi DX
NOOBS-compatible

image updated! (v1.22/v1.7 DLE)

      During 2020, I released an update for my DreamPi NOOBS-compatible image (v1.21) for Raspberry Pi for the Sega Dreamcast, built against v1.7 DLE stock image.

      A DreamPi is a customized Linux distro and a set of hardware created by a fellow named "Kazade" which will create a simplified dialup network server in order to get a Sega Dreamcast back online for web surfing and online gaming. The DreamPi is a standardized Raspberry Pi setup with dialup hardware and appropriate software to suit. Online gaming is handled via resurrected, private game servers. The stock DreamPi image is one which must be written to the entire SD card of the Raspberry Pi, and thus doesn't easily allow a multi-boot setup with other Linux distros on the same SD card. This DreamPi NOOBS-compatible image is compatible with NOOBS or PINN bootloaders. NOOBS is a simple bootloader which allows one to install NOOBS-compatible distro images in such a way as to allow for a simple multi-boot configuration, while PINN is an enhanced version of NOOBS. PINN fixes some design flaws and adds new useful, convenient features. PINN is highly recommended over NOOBS.

  The DreamPi NOOBS compatible image works with both NOOBS and PINN, and allows one to install a DreamPi distro with others in a multi-boot configuration. During 2020, the DreamPi NOOBS image was upgraded against v1.7 DLE, a few new online games were added to the supported games list within the installation slideshow, and online repository support was added to allow installing DreamPi NOOBS via the internet (PINN support only).


Since my older v1.7 DLE NOOBS image (v1.21) was released, 1 new game has had their online support resurrected:
Dee Dee Planet gameplay
 
   I have updated the DreamPi NOOBS-compatible image to v1.22 . This and future builds will be called DreamPi DX (Deluxe) going forward henceforth, and will have community made code patches pre-installed. These patches will further enhance DreamPi with newer features and quality-of-life improvements. This latest build adds better functionality for Dreamcast BBA (Broadband) modem support and Sega Saturn Netlink/XBAND modem online gameplay.

Sega Saturn Netlink modem review


Changelog (DreamPi DX NOOBS v1.22/v1.7 DLE):
  • First DreamPi NOOBS DX Image release (addons to stock DreamPi image)
  • Separate image flavors
    • "DreamPi4 DX" for newer Raspberry Pi models (RPi 4 and newer)
    • "DreamPi" for older Raspberry Pi models

  • Patch addons
    • DreamPi Netlink Tunneler for Netlink (Sega Saturn)
    • Dreamcast Now for BBA
      • Allows DreamPi to appear on Dreamcast Now service when using a BBA connection
      • DC Now BBA patch thread
      • Usage
        • Login in to DreamPi, run
          . /home/pi/dreampi/dreampi_now.ksh
        • Select the game ID

    • Wi-Fi to Ethernet bridge (BBA)
      • If the DreamPi is using WiFi connection for internet and Dreamcast is using a BBA, allows to repeat/bridge highspeed broadband connection to the Dreamcast
      • WiFi/Ethernet bridge patch thread
      • Usage
        • Login into DreamPi
        • Run
          . /home/pi/wifi-to-eth-route.sh

  • Updated installation slideshow
    • Added new slides detailing information on the DX patch addons
    • Added new slides on information for Xrider's BBA conversion kit
    • Added new slide for information
    • Updated slides with latest game listing support (Dee Dee Planet)


     You can download the latest DreamPi NOOBS compatible image (for offline install) and read the guide at this EagleSoft page. The latest version can also be installed online as usual through the Tamkis NOOBS Repo; just add the line alt_image_source=http://raw.githubusercontent.com/Tamk1s/Tamkis_NOOBS_Repo/main/os_list_v3.json to your recovery.cmdline file at the root of your PINN installation and connect online. The images will be located under "Games" tab.
 
Download support through
Tamkis NOOBS Repo
 
    For those whom want faster internet speeds and bandwidth on their Sega Dreamcast but cannot afford the rare and expensive BBA (Broadband) adapter, you can purchase and build yourself a DIY BBA Adapter using Xrider's Conversion Kit (RetroRGB article, Dreamcast Talk thread). Just salvage a G2 bus connector from an old Dreamcast dial-up modem, purchase Xrider's kit, find an Atomiswave Communication Cartridge, and solder it all together. The Sega Sammy Atomiswave was an awesome arcade version of the Sega Dreamcast with similiar hardware, more RAM, and a Broadband modem variant built-in (the Atomiswave Communication Cartridge). If you are feeling adventurous, you could also hack up both a Dreamcast dial-up modem and the DIY BBA modem together for a combo modem to have the best of both worlds without swapping out modems. (Both the dial-up and BBA modems handle different sets of games.)
 
DIY BBA Kit contents
 
 
 DIY Sega Dreamcast BBA
Converter kit tutorial

 
     Have fun playing online on Sega Saturn (Netlink/XBAND) gaming, and on the Sega Dreamcast with high-speed broadband internet access
 
Welcome to the next level
-Tamkis

DreamPi NOOBS-compatible image updated! (v1.21/v1.7 DLE, now with online repository support)

DreamPi NOOBS-compatible
image updated! (v1.21/v1.7 DLE)

  During 2019, I released a newer version of a DreamPi NOOBS-compatible image for Raspberry Pi for the Sega Dreamcast, built against v1.7 DLE stock image. A DreamPi is a standardized set of software (a customized Linux distro) and a set of hardware created by a fellow named "Kazade" which will create a simplified DC-PC server, for getting a Dreamcast back online to connect to the Internet for browsing and online gaming, via resurrected, private game servers. The stock DreamPi image is one which must be written to the entire SD card, and doesn't easily allow a multi-boot setup with other OSes on other SD card partitions. This DreamPi NOOBS-compatible image is compatible with NOOBS or (by extension, the recommended, superior) PINN. NOOBS is a simple bootloader, which allows one to install NOOBS-compatible distro images in such a way as to allow a simple multi-boot configuration, while PINN (derived from NOOBS) is a enhanced version of NOOBS, which fixes some design flaws and adds new useful, convenient features. PINN is recommended over NOOBS.

  The DreamPi NOOBS compatible image works with NOOBS/PINN, and allows one to install a DreamPi distro with others in a multi-boot configuration. During summer 2019 , the stock DreamPi image was upgraded to v1.7 DLE. This has the same features as v1.7, but with the speed stability bugfix applied and an updated DreamPi WiFi Config Wizard packaged with it.

Since my older v1.7 DLE NOOBS image (v1.2) was released, 3 new games have had their online support resurrected:
  • Internet Game Pack
  • Metropolis Street Racer
  • Mobile Suit Gundam: Federation vs. Zeon DX (this game looks awesome 😀)
MSG: FvZ DX
 
Giant robot fighting anime mechs
online with the Dreamcast;
what more could I want?

You can read the previous Dreamcast Live blog post for information about the Changelog for v1.7 DLE.
 
   I have updated the previous DreamPi NOOBS-compatible image (built against stock image v1.7 RPi 1-3 flavor) to v1.21. This new build features:
  • Updated installer slideshow
    • Inserted new Slide F with the 3 new games
  • Created a marketing.tar tarball archive with the slides_vga slideshow slides (for the online repository server support)
  • Created source code repositories
    • Hosted all DreamPi NOOBS image source files on a SourceForge repository
    • Hosted a repo_list.json and os_list_v3.json file on a central Github repository
    • Both repositories allow for NOOBS online distro repository support!
      • Can download the NOOBS distro from online
      • Online auto-updating and reinstallation on PINN

Do note that this online repo support is relatively new and beta, and has only been tested with PINN. The v1.7 DLE distro currently hosted is the Raspberry Pi 1-3/Zero flavor; I only just discovered right at the time of this writing that there is a separate v1.7 DLE flavor for Raspberry Pi 4. A separate NOOBS image of the RPi 4 flavor will be built and hosted online very soon, as well as tweaks and additions made to the repository JSON files online to handle both flavors.

In order to access the distro image from the online repository, please read the instructions in the updated DreamPi NOOBS webpage. For both NOOBS and PINN, you'll need to edit your recovery.cmdline file (after first initalization of NOOBS/PINN) at the root of the SD card.

Basically summary to access the repository server:
Using either option and rebooting should allow DreamPi to show up in the "Games" tab, and be downloaded online. In order to allow auto-updating of the distro, any old versions of the DreamPi distro (installed from external media) will probably need removed and replaced from the version downloaded from the online server.


You can download the latest DreamPi NOOBS compatible image and read the guide at this EagleSoft page. The webpage has also been updated with developer information on how to serve a NOOBS-compatible image online in a repository. (NOOBS/PINN are picky on where/how the distro image files can be hosted online.) This online feature is relatively beta.

Have fun playing online and having DreamPi multi-boot with other OSes on NOOBS/PINN!

-Tamkis

DreamPi: DIY Industrial LVI

DreamPi: DIY Industrial LVI


    In a few prior posts, I have detailed some information about getting a Sega Dreamcast back online by using a DreamPi. A DreamPi is a standardized set of software (a customized Linux distro) and a set of hardware created by a fellow named "Kazade" which will create a simplified DC-PC server, for getting a Dreamcast back online to connect to the Internet for browsing and online gaming, via resurrected, private game servers. In a few other posts I have also detailed using and writing a customized DreamPi NOOBS-compatible image that I have created for adding the DreamPi Linux distro onto an SD card in a mulit-boot setup (via NOOBS/PINN bootloader).

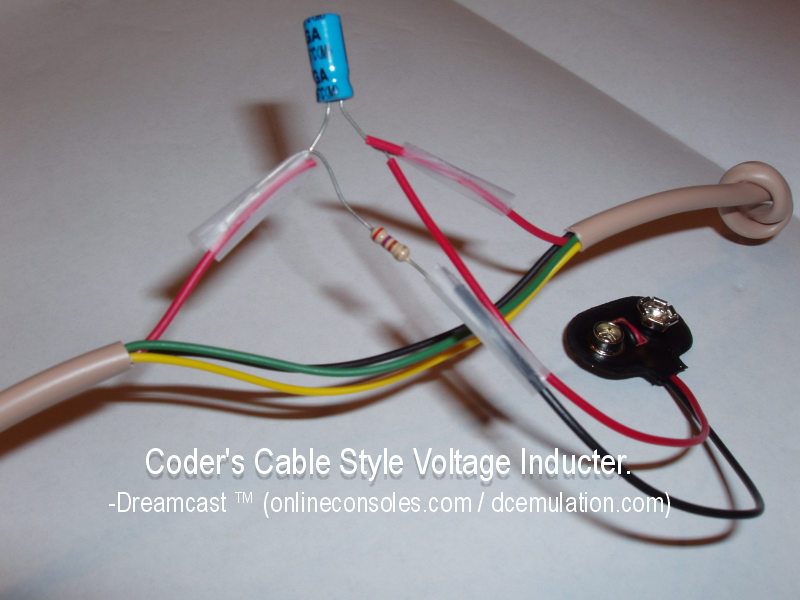
   One of the main hardware components that is often required for setting up a DreamPi is a Line  Voltage Inducer. Most of the dial-up 56k modems models built into most Dreamcast models require voltage on the red wire (+power line) of the RJ11 phone cable; a Line Voltage Inducer (LVI) is a simple circuit, consisting of an electrolytic capacitor, a resistor, and a 9V battery, which will apply the proper voltage to the red wire (+power line) of the RJ11 phone lack for proper operation of the Dreamcast's dial-up 56k modem.
 
Simple depiction of an LVI
(Not electrically functional just depiction, duh.
Pic credited to onlineconsoles.com)

  Although fellow DC scener PCWizard does sell both awesome, Linux-compatible USB RJ11 modems for DreamPis and even complete DreamPi kits at the Dreamcast Live shop, when I built my DreamPi back in January 2018, I built my own kit from scratch, by shopping for the components on eBay and making my own DIY LVI. (If you are not technical, if you would just want to have a simple complete kit, and if you have the money, I do recommend buying from the Dreamcast Live shop in order to support both DC Live and the scene.) Making my own DIY kit was done both to save money and for the fun/learning factor; if I remember correctly, I gathered everything for about $50, so I saved some money. (In comparison, at the time of this writing, a complete Standard DreamPi kit from the Dreamcast Live site is USD $79.99, and a Raspberry Pi 3 DreamPi Kit with WiFi support is $99.99 . My DreamPi consists of a used Raspberry Pi Model 2B kit from eBay, which uses an Ethernet connection for the internet. I saved a little more money since I already had spare components available for assembling the DIY LVI.) For the DIY LVI, I just cut open a spare RJ11 cable in half, and soldered the LVI circuit in between the halves on a spare RadioShack prototype PCB. (RIP brick and mortar RadioShack stores, you are still greatly missed in 2019 😢.)

   At a previous job many years ago, I once had a summer job doing some contract EET work of wiring up some safety-related electrical equipment, which was my highest payable job to date (my High Score) of a whopping $20/hr. The main task of the job was cutting open RJ45 Ethernet cable, twisting certain pin pairs of the cable, crimping the pairs into spade terminals, and inserting the spade terminals into screw terminals of the safety devices, in order to wire up a Modbus protocol cable for the devices. Since that job, I have disliked dealing with RJ45/RJ11 cable, due to how difficult stripping, splicing, and dealing with the small gauge of this stranded wire was.

    Like with the old job, one problem I found with creating that LVI (which I will now call "LVI 1.0" throughout the article) was that it was flimsy and hard to solder down. Some soldering wizards just make their own DIY LVI by soldering the circuit components directly between RJ11 wires (no PCB used, like with the simple LVI depiction above); I find doing soldering in between wires like that very difficult. Standard RJ11 wire is both very small gauge wire (either 22 or 24 AWG gauge wire, with 24 being the standard) and is usually stranded (the wire itself has various strands, must be twisted together for easy soldering, and soldered down properly as a whole for stable electrical conductivity). After some attempts, for LVI v1.0, I soldered down the RJ11 wire onto the board, and had to apply some electrical glue to prevent strain on the fragile, soldered RJ11 wire as the ends moved. Despite this, however, some of the RJ11 wires soldered down still would sometimes break off from the PCB, and I would have to redo the soldering for the affected wires. It was annoying.


LVI v1.0

  A few months ago, after repairing and breaking the circuit for a 2nd time, I decided enough was enough, and to design a solderless, industrial-strength LVI. Instead of even soldering and dealing with the small, fragile, stranded gauge of wire that is RJ11 wire, I designed a better LVI (LVI v2.0). LVI 2.0 is a far more stable design, consisting of x2 4P4C RJ11 wall plates (which utilize user-friendly screws and wire terminals for each pin), a breadboard for the LVI circuitry itself; shorter, replacement plate screws and washers; and small gauge, solid-core, copper wire and 22-16 spade terminals to connect both RJ11 wall plates together and to wire up the red wire (power+ pin) to the mini breadboard with the LVI circuity. To wrap up the industrial-strength LVI, it is all enclosed in a fancy metal box, with the wall plates screwed into the top lid and bottom case (with washers), and cuts to insert the RJ11 keystones.

  The whole thing cost ~<USD $15 if I remember correctly, and was pain-free to create (compared to dealing with that pesky RJ11 24 AWG gauge wire).

Parts/approx. cost:
  • Metal box
    • Acquired on sale from a Pat Catan's closing sale
      • Pat Catan's was a local craft store, which also went RIP like RadioShack earlier this fall 😢.
      • It's inventory and business has since been absorbed into Michael's another local Craft store
    • Equivalent box from Michael's
  • RJ11 keystone wall plates
    • Steal of $0.50 each from a Pittsburgh Goodwill store 😀
  • Box of 20 22-16 Spade Terminals


  • Shorter RJ11 plate screws and washers for about $2 total both from Lowe's
    • Shorter screws needed because screws that came with plates were too long to fit into box
    • Washers needed to clamp down wall plates to metal box halves
  • LVI Circuitry
    • 1μF electrolytic capacitor
    • 390Ω resistor
    • 9V battery terminal
    • Some from either RadioShack or from part grab-bags elsewhere online
  • Mini breadboard
    • $4 for pack of 6 from Frentaly (eBay)
    • Not depicted/used yet; to be bought later
    • Temporarily using a small segment from my main breadboard (which currently has a prototype Sony Super Multi circuit on it)
  • Edit - 11/2/2020
     Assembly was easy; just measure and Dremel out holes for the RJ11 wall plates, drill out holes for the plate screws, screw in the plates (with washers inside the box), and then assemble solid-core, copper, jumper wires for wiring up everything. And also drill out M3 metric holes for the standoff leges, screw them in (11/2/2020 edit). The drilled screw holes and the square cuts for the keystones were filed down (they were too sharp initially). Each jumper wire was cut and stripped, and spade terminals applied to the ends as needed. The black, yellow, and green RJ11 pins between both wall jacks were respectively connected by screwing the spade terminals jumper wires between them (direct connection), while the red pins (power+) from each plate was connected via spade terminal and into a small breadboard (bare solid wire). This breadboard contains the LVI circuity itself for applying the voltage.
   And voila, a high quality, industrial-strength LVI was created! This LVI has served to be much more sturdier than v1.0, and has been working flawlessly since. Never again do I have to deal with that pesky RJ11 wire for tweaking. Pictures below of the industrial-strength LVI masterpiece.

Entire DreamPi setup
(excuse the mess, semi-temporary living quarters)
Raspberry Pi

Sega Dreamcast

Industrial Strength LVI
LVI Circuit (on temporary breadboard)
LVI Setup


Connecting to the internet with DreamPi
and Industrial-strength LVI
(DreamPi distro output,
Quake 3 Arena,
PlanetWeb connecting to EagleSoft Ltd.)

12/16/19 Update!
Finally ordered and finished the Industrial LVI
with a dedicated mini breadboard.
Enclosure can now close shut!


11/2/2020 Update!

Drilled M3 metric holes on bottom, in order to mount PCB Legs to the bottom of the case.
This makes connection of RJ11 cables easier.


    EagleSoft Ltd. and Labs has been kinda quiet lately, but behind the scenes, I have been working on a new ROM hack (a Knuckles Chaotix hack for the almighty Sega 32x), and EagleSoft Ltd's first self-published, commercial, Unity3D/C# Indie video game, titled StarEagle: Defenders of the Galaxy. More details about both games in the next 2 blog posts.

   Also, that repair of getting that Sega Model Virtua Fighter arcade board is still ongoing (saving up money to gather parts needed), and also a blog post about getting that awesome NeXT Cube boot up coming soon (also saving up money for parts).

Stay tuned for those upcoming blog posts and game announcements!


DreamPi NOOBS-compatible image updated (v1.2/v1.7 DLE)

DreamPi NOOBS-compatible
image updated! (v1.2/v1.7 DLE)

  During 2018, I released a DreamPi NOOBS-compatible image for Raspberry Pi for the Sega Dreamcast. A DreamPi is a standardized set of software (a customized Linux distro) and a set of hardware created by a fellow named "Kazade" which will create a simplified DC-PC server, for getting a Dreamcast back online to connect to the Internet for browsing and online gaming, via resurrected, private game servers. The stock DreamPi image is one which must be written to the entire SD card, and doesn't easily allow a multi-boot setup with other OSes on other SD card partitions. This DreamPi NOOBS-compatible image is compatible with NOOBS or (by extension, the recommended, superior) PINN. NOOBS is a simple bootloader, which allows one to install NOOBS-compatible distro images in such a way as to allow a simple multi-boot configuration, while PINN (derived from NOOBS) is a enhanced version of NOOBS, which fixes some design flaws and adds new useful, convenient features. PINN is recommended over NOOBS.

  The DreamPi NOOBS compatible image works with NOOBS/PINN, and allows one to install a DreamPi distro with others in a multi-boot configuration. Recently, the stock DreamPi image was upgraded to v1.7 DLE. This has the same features as v1.7, but with the speed stability bugfix applied and an updated DreamPi WiFi Config Wizard packaged with it. 

Also, since the original v1.7 was released around last summer, 3 new Dreamcast games have had their online functionality resurrected:
  • Samba De Amigo
  • Sonic Adventure 2
  • San Francisco Rush 2049

You can read the Dreamcast Live blog post and forum thread from the previous link for information about the Changelog for v1.7 DLE.
 
   I have updated the DreamPi NOOBS-compatible image against the updated DreamPi v1.7 DLE stock image. Summary of changes for this version of the image:
  • Updated NOOBS image against v1.7 DLE DreamPi image
  • Updated installer slideshow
    • Added optional WiFi connection to the list of minimum hw requirements
    • Updated list of online-compatible games, and added link to list of online games at Dreamcast Live website
    • Added slide with info about DreamPi Companion app
    • Added slide with info about the DreamPi WiFi Config Wizard
    • Removed slide about the speed bugfix


You can download the latest DreamPi NOOBS compatible image and read the guide at this EagleSoft page.

Have fun playing online and having DreamPi multi-boot with other OSes on NOOBS/PINN!

-Tamkis

Enabling telnet on a WNR2000 Router (OpenWRT install)

Enabling telnet on a
WNR2000v4 Router
(OpenWRT install)

Background:

   During late 2018 due to reasons, I temporarily moved back home into my parents' basement to look for better game development employment elsewhere while working at a few temp jobs. Previously I was living with my great roommates in an apartment, and fortunately my room was close enough to run a 20ft or so long Ethernet cable from the ISP's router to my room for Internet. Earlier in 2018, back at home, my father "upgraded" the shady Comcast router with a shadier, newer one, and gave me the old router, a Netgear WNR2000v4 router. At the apartment, I used this router as an overglorified network switch for the devices in my room, for giving Internet access to my laptop, a legacy PC, or any older video game consoles or devices that required wired Internet. I also prefer a wired Ethernet connection over WiFi when I can, since it can be more secure and have less overhead (faster and more reliable) than dealing with wireless Internet. Unfortunately, since this was a 2-router network setup, the network was somewhat complex (outer ISP router being on a 192.168.x.x subnet, with my inner router being on a 10.0.x.x subnet). This 2-router network prevented things such as connecting the PS2 versions of Star Wars Battlefront 1 & 2 to SWBFSpy (which requires getting an IP whitelisted by the server's admin for usage).

   Unfortunately, when I moved back home into my room, I didn't have the privilege of having wired Ethernet available, due to the ISP's router being on the other end of the house from my room and my "roommates" not going to like having a 50+ ft. length of Ethernet cable running across the houses to the ISP's router. This obviously wasn't a problem to give Internet access for devices that can use WiFi, but definitely one for devices that only have a wired connection (such as those older video game consoles). Most modern day routers have a web-based GUI for configuring the router (by connecting to the default router gateway in a web browser and logging in as the admin); the WNR2000v4 was no exception. Unfortunately, the default gateway's GUI (called "Genie" by Netgear) for this particular router model does not have a wireless bridging feature, just basic router functionality (via Ethernet or WiFi) for an Internet connection and network switch functionality between wired devices. Getting a wireless bridge function working would allow me to connect devices via wired Ethernet to my room's router and then forward the network data wirelessly (via WiFi) to the main router on the other side of the house. This would allow wired Internet connections from my room to connect to the Internet, and would additionally make the network appear as a single-router network from my router's perspective (with a single subnet; not having to use 2 subnets like at the apartment). Rather than wasting precious money on a dedicated wireless bridge to solve my problem, I was resourceful and used my brain instead, looking into hacking my spare Netgear WNR2000v4 router to install OpenWRT.


Telnet enable attempt/Installing OpenWRT

   For those whom are unaware, OpenWRT is a lightweight Linux distribution meant for embedded devices (especially routers). Installing OpenWRT as a replacement firmware on a router removes any restrictions with the stock firmware, and allows full control of the hardware, as well as beefed up security. Basically it can turn any router into a fully configurable business one (with telnet, VLan setting up, etc), just like the Cisco ones my classmates and I learned about in my networking class at college. Most importantly, OpenWRT has a few packages that can be installed to enable wireless bridging functionality on this router. This would solve my problem of connecting my wired devices to the ISP router on the other end of the house without using a double-router setup with 2 subnets and a very long Ethernet cable.

   Unfortunately, the stock firmware on the WNR2000v4 has its telnet feature locked. To summarize the basic process of installing OpenWRT on router devices, you need to telnet into the router (using software such as PuTTY) and flash the device with the new firmware. This file is sent to the router via a TFTP server on a computer, and the flashing is done through a Linux console on the router by running some Linux commands. Most Netgear routers have the telnet locked for security reasons, and in order to unlock the telnet, a special packet usually must be sent either over UDP or TCP (depending on the particular router model). Usually a special program is used to send the magic packet and unlock the telnet. More details about unlocking the telnet on Netgear routers can be found on this OpenWRT article, and full details about installing OpenWRT on the WNR2000v4 router (including an UDP telnet enable python script) can be found on this other OpenWRT article under "How to Install OpenWRT on the Netgear WNR2000v4 through u-boot-env modification on Linux" section.

  Also unfortunately, neither the UDPtelnetenable.py script worked within a Linux virtual machine, nor did any of the telnet enable programs for Windows in the other article were able to unlock the telnet on my router. Perhaps my particular router unit was a newer hardware revision that blocked telnet enabling altogehter, or some other weird networking issues were preventing the packet from being sent/received and properly unlocking the telnet. Fortunately, while doing a Google search about my problems, I came across a security vulnerability (CVE-2016-10174) for the similar WNR2000v5 router, which, when exploited, can allow an attacker to bruteforce the admin password, enable telnet, and then gain a Linux root console access. These privilege escalations through the exploit are a pretty serious security vulnerability, and you really should replace this router with a more secure one if you wish to use its stock firmware (or do the smart thing and replace the firmware with the much more secure OpenWRT like I'm doing). A person online also wrote up details about the security vulnerability and a PoC hack here. Most importantly, a formal exploit was published and included with the Metasploit framework for white hat hackers. This security vulnerability is confirmed to exist and to work on the v5 router, but only has static analysis to show possible existence on the v4 and v3 routers. Using this exploit to enable telnet and gain the Linux root console access, I could properly install OpenWRT fully without relying upon the broken telnet enable programs that weren't working for me. Since I know the admin password to my own router, I could bypass the password bruteforcing, and just use the exploit to enable telnet/gain Linux root console access, speeding up the exploit process.

Enabling Telnet the hard way
via the security exploit

    Since none of the UDP telnet enable programs were able to properly send the magic packet and enable telnet, I decided to enable telnet the hard way, by bruteforcing telnet enable and gain a root Linux console through the exploit. I did this through installing and using Pentestbox with Metasploit. Fortunately Metasploit has a penetration module to run the exploit on the WNR2000 series of routers; instructions and details on the module usage here. I also had to upgrade my router to firmware 10.0.0.58, which is required for installing OpenWRT (see the main OpenWRT install article for this router for the stock firmware link). If I remember correctly, basically I logged into my router's gateway interface (Genie) via the admin password (in order to get the timestamp from the router for the exploit), and then immediately ran the Metasploit module on the page that confirmed access was granted, and was able to get temporary telnet enable and a root Linux console access on the router after the exploit successfully ran. Then I ran all of the normal OpenWRT installation steps for the WNR2000v4 router (setup the TFTP server, send the OpenWRT firmware, run the Linux consoles commands to flash the firmware, etc).

  After all of this was done, I got OpenWRT installed on my spare WNR2000v4 router, and proceeded to setup wireless bridging to solve my original networking problem. So now this router has wireless bridging functionality, and a much more secure firmware (OpenWRT) without nasty, inexcusable security vulnerabilities like CVE-2016-10147. This installation also proves that the vulnerability exists and that the exploit does indeed work for not only the WNR2000v5 router, but also for the v4 router. (Meaning you really should replace this router if you have one or install the much more secure OpenWRT firmware on this model.) Hopefully anybody who runs across the same issue I had with being unable to unlock telnet for an OpenWRT install on a WNR2000 v3-v5 router with the special magic packet programs will find this article useful, and use the security vulnerability method to bruteforce telnet enable/root Linux console access as a last resort.

-Tamkis

DreamPi NOOBS-compatible image updated (v1.1/v1.7)

DreamPi NOOBS-compatible
image updated! (v1.1/v1.7)

  Earlier this year, I released a DreamPi NOOBS-compatible image for Raspberry Pi for the Sega Dreamcast. A DreamPi is a standardized set of software (a customized Linux distro) and a set of hardware created by a fellow named "Kazade" which will create a simplified DC-PC server, for getting a Dreamcast back online to connect to the internet for browsing and online gaming, via resurrected, private game servers. The stock DreamPi image is one which must be written to the entire SD card, and doesn't easily allow a multi-boot setup with other OSes on other SD card partitions. This DreamPi NOOBS-compatible image is compatible with NOOBS or (by extension, the recommended, superior) PINN. NOOBS is a simple bootloader, which allows one to install NOOBS-compatible distro images in such a way as to allow a simple multi-boot configuration, while PINN (derived from NOOBS) is a enhanced version of NOOBS, which fixes some design flaws and adds new useful, convenient features. PINN is recommended over NOOBS.

  The DreamPi NOOBS compatible image works with NOOBS/PINN, and allows one to install DreamPi distro with others in a multi-boot configuration. Recently, the stock DreamPi image was upgraded to v1.7. You can read the Dreamcast Live blog post and forum thread from the previous link for information about the ChangeLog, but to summarize the changes:

  • Updated Firmware
    • Image rebuilt against newer minimal Raspbian distro.
    • Now supports Pi Zero W and Pi 3 B+ models of Raspberry Pi
    • Smaller image size
  • 2K Games support
    • Supports resurrected servers for the supported 2K series of sports games (NBA 2k1/2, NFL 2k1 etc; see up-to-date games list)
  • Wi-Fi Config Utility 
  • Bugfixes
   I have updated the DreamPi NOOBS-compatible image against the updated DreamPi v1.7 stock image. The DreamPi NOOBS guide has been updated to detail how to upgrade your DreamPi partition from an older version to a newer version via the latest NOOBS image, and clarifies a few items. The upgrade requires the latest version of PINN, which has now introduced a "replace" OS function, as well as dual-firmware support to handle Raspberry Pi models 3B+ and newer and also older models. This OS replacement feature will upgrade DreamPi with the newer image, without deleting or modifying other partitions within your multi-boot setup on PINN.


Do note that this image may need the speed bugfix applied to make it boot consistently.

You can download the latest DreamPi NOOBS compatible image and read the guide at this EagleSoft page.

Have fun playing with the new support for the 2k series of sports games, and having DreamPi multi-boot with other OSes on NOOBS/PINN!

-Tamkis

DreamPi NOOBS-compatible image release

DreamPi NOOBS-compatible
image release!

    Two years ago for my 24th birthday, I finally picked up a Sega Dreamcast, one of Sega's coolest and most innovative game consoles, which unfortunately was discontinued prematurely during its video game generation. It's still possible today to get a Sega Dreamcast online (even without a dial-up service available at a residency), to browse the web and send emails on DC-compatible web browsers, and even to play some online games again via resurrected private servers. The Sega Dreamcast comes supplied with a 56k dial-up modem; although a DSL Broadband adapter (the infamous "BBA") exists, it's quite rare and expensive (still so today). 

 Older attempts at getting my Dreamcast back online

    During that year, I tried getting my Dreamcast online by creating a Linux-based PC-DC server on my modern laptop. A PC-DC Server is a set of software that runs on a computer that converts a modern-day ethernet internet connection to something that dial-up based computers can use to connect to the internet. The software will answer to the dial-up calls from older computers, and convert the modern-day internet connection to a dial-up connection which the older device can use. My modern development machine just so happened to have a legacy v.92 Fax-modem port. Unfortunately, the modem model of my Dreamcast requires a voltage on the dial-up connection in order to function, so I soldered up a Line Voltage Inducer circuit. Although I tried running some Linux commands on a BunsenLabs Linux virtual machine to run a PC-DC server, I was only able to connect the Dreamcast to the internet for browsing; I was unable to get it to connect to private game servers. Often a connection attempt would be flaky, which was odd, and I suspected the LVI not to be soldered that well.

   Thinking the issue could be either hardware or setup related (especially with using a virtual machine), a year later I received from someone a very nice, used, older PC tower (a custom-built K8V SE Deluxe mo'bo in a ThermalIntake XTaser3 case). Always wanting a machine dedicated to playing old DOS and Windows 95-based titles, I installed Windows ME onto an HDD for the machine. Although ME does not have direct Real Mode DOS support out of the box (it's buried in the OS), it's possible to hack Real Mode DOS functionality back into the machine. More about this machine in an upcoming blog post or video. With the machine, I installed into it a v.92 US Robotics PCI card for dial-up connections, which would give a much more authentic dial-up connection for a PC-DC server. After installing the related software to setup a PC-DC server using the PCI dial-up modem (Windows 98 guide), I still was only able to browse the web, but not connect to games. At one point the modem card caused booting up of ME to not respond indefinitely, and, due to my usage of the particular Real Mode DOS hack I used ("Real Mode DOS Patch 3", which sacrificed emergency boot and Safe Mode functionality to use) and not having a working System Restore point (due to not having an update patch which fixes system restore failure issues past an odd Sept. 2001 date), I had to reformat the drive with a fresh Windows ME install. At this point I gave on trying to setup a PC-DC server via VM and dedicated DosBox for an online connection and decided to eventually purchase a DreamPi.

Physical Windows ME
DOSBox :)

DreamPi attempt

   A DreamPi is a standardized set of software (a customized Linux Distro) and a set of hardware created by a fellow named "Kazade" which will create a simplified DC-PC server. A DreamPi setup consists of a Raspberry Pi model 2/3 computer, a Linux-compatible USB Fax modem, an ethernet connection, and a Line Voltage Inducer. The software takes care of the dial-up connection with a very minimum, automated setup for the user, and will even allow the user to create an account for the DreamPi on the Dreamcast Now website. The Dreamcast now website will show the usernames of players currently online with DreamPis, and which online compatible game they are playing, allowing for easy hooking up with people for online matches. DreamPi by extension can also get other dial-up based computers back online, including the Sega Saturn, which can browse the restored NetLink zones for NetLink compatible games (Saturn guide). One problem with the DreamPi Linux distro is that it is a raw image file, meant to be written directly to the SD Card, making it quite unsuitable for allowing multi-booting of various OSes on the same SD Card.

 DreamPi Kit

DreamPi NOOBS-compatible image

    To fix this problem, I have released a NOOBS-compatible DreamPi image, based off DreamPi v1.6. NOOBS (New Out-Of Box Setup) is a bootloader for Raspberry Pi, that allows the installation of multiple OSes in such a way as to allow multi-boot. This DreamPi image works with NOOBS, and has a nifty slideshow upon installation explaining the features of DreamPi. By extension, this image is compatible with PINN. PINN (PINN Is Not NOOBS) is an enhanced version of NOOBS, which I recommend over using NOOBS. It has the following extra features over standards NOOBS:
  • Various ways to install OSes
  • Install from SD Card (offline)
  • Install from online server (with a wider variety of OSes)
  • External Media
    • USB Flash Drive
    • External SD Card via a USB SD Card reader
  • Install additional 512MB ext4 Data partitions, for general data usage
  • Download and archive to the SD Card the OSes from the online server, for offline installation
  • Easily reinstall OSes if something goes wrong (without having to redo a fresh NOOBS/PINN setup)
  • Various maintenance capabilities
    • OS maintenance utility
    • Recovery shell
    • SD card clone utility
    • Password restorer
    • File System Checker
  The image can be downloaded on its page in the Sega Dreamcast section of my website, along with info about it and how to use it. With my DreamPi, I was finally able to get my Dreamcast and Saturn back online for web browsing, and to get the Dreamcast back online for gaming! Couple with my NOOBS-compatible image, I was able to get a few other Linux distros working on the same SD card with a multi-boot setup.


Installing and using
DreamPi NOOBS compatible image

Installation slideshow
 

Some pictures of getting my
Dreamcast back online with DreamPi :)
 Getting my Sega Saturn
to browse the web with DreamPi
 Enjoy this DreamPi NOOBS compatible image for getting your Dreamcast/other dial-up computers back online, while enabling multiboot for other Linux distros!

-Tamkis
Copyright EagleSoft Ltd. Powered by Blogger.