Virtua Fighter Arcade Repairs, Part I: Introduction

Virtua Fighter Arcade Repairs
Part I: Introduction
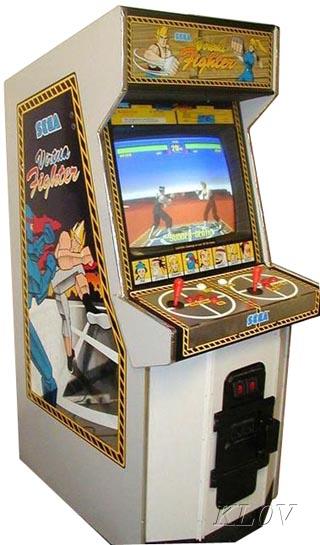


  June 2019 was a great month! While surfing the local Pittsburgh Craigslist video gaming/electronics ad sections online, I came across a listing for a Virtua Fighter (Sega Model 1 arcade) ROM board set, with the owner selling it for $20/offer. I've never owned an arcade machine before (let alone an awesome Model 1 machine), and for the super cheap price of $20, I couldn't refuse to check it out!

Background Information
on the Sega Model 1 arcade hardware

   The Sega Model 1 arcade system was developed by Sega (specifically by the legendary Yu Suzuki and his AM2 team) from 1990-1992 as their very 1st dedicated arcade machine designed to handle flat-shaded, polygonal, 3D graphics, and was released to the market in 1992 with the launch title Virtua Racing. Ironically, Virtua Racing was developed internally as a game to test the Model 1 system's raw power; however, the game proved to be such a success at Sega, that Virtua Racing and the Model 1 system were commercially released anyways to the public. During this era, Namco was the industry leader with 3D polygon technology with its System 21 arcade hardware running games such as Galaxian^3 and StarBlade; Sega intended to compete with Namco with its new Model 1 hardware. Sega's new polygon crunching arcade machine to hit the block was originally known as the "CG Board", but was retroactively given the name "Sega Model 1" after its successor, the Sega Model 2 system, was created a few years later. The Sega Model 1 system handled rendering its cutting-edge, flat-shaded, 3D polygon graphics by using some Fujitsu MB86233 DSP chips (aka the TGP chip, Sega 837‑7894), and can output anywhere between 120k-410k polygons/sec based on the rendering mode. Some of these TGP chips were stock chips, other ones were modified with custom Sega microcode in order to be used as coprocessors, and others were modified with T&L hardware 3D rendering functions. The TGP chip has hardware support for handling 32-bit floating point, 32-bit fixed point, and 24-bit integer data types, which greatly helped with speedily pumping out the math needed to plot high-precision 3D polygons. Other early 3D games of that era may have used custom 16 or 32-bit fixed-point data types and math on CPUs that didn't support hardware-based fixed/floating point calculations (they used fixed point software emulation), and thus had much overhead and wasted CPU cycles in handling the 3D math needed. Due to the overhead, such games ran at low FPS and had low-precision, jittery polygons. Such games include the original Doom on PC (when not using an Intel x87 FPU coprocessor) or StarFox on the SNES.

A TGP chip

    Model 1 machines do not use the now-standard JAMMA wiring, but a machine-specific wiring setup, and they are "medium resolution" machines, meaning that they use RGBS CRT monitors running at 24 kHz and at a resolution of  496×384 px. As for sound, the machines use two MultiPCM sound chips. The MultiPCM chip is a custom Sega 315‑5560 chip based on the Yamaha YMF278 (OPL4) chip, which has been customized with the FM synthesis removed and just having Wavetable PCM support. These chips output 28 PCM channels running at an audio data rate of 16-bit, 44100 KHz stereo. One MultiPCM chip is used for music, while the other is used for sound effects. On the MultiPCM sound board, the MultiPCM chips are controlled with a Toshiba TMP68000N‑10 (a Motorola 68k chip) at a speedy 12 MHz, and with a Yamaha YM3834 chip (which is only used for sound timing). The machine also has an I/O board for handling the game's controls, and is run by a Z80 CPU at 4 MHz. The main machine itself runs on a NEC V60 CPU, running at a whopping 16 MHz. This CPU interfaces with all of the hardware and subboards for controlling the game.

Sega Model 1 Sound Board


 Sega MultiPCM chip

 MultiPCM music sample
(Guns and Wings Yak 141, Wing War)

  Sega Model 1 arcade games were incredibly cool and technically impressive for their time. While other home video game consoles during 1992 still were primarily using lame, boring 2D sprite and tilemap-based games, the Sega Model 1 system blew them out of the water with 60FPS, flat-shaded, 3D polygon graphics. Unlike with some of the early 3D polygon games (such as StarFox on the SNES) which were software-rendered, had low FPS, or had jittery polygons, the Model 1 was able to hardware render accurate, high-precision polygons at a whopping, steady 60 FPS, and even had hardware T&L to accelerate everything too. Compared to games on the Namco System 21, the Model 1 ran at a solid 60 FPS, and many of their games supported multiplayer and multiple camera angles. The flat-shaded 3D models on the Model 1 were bright, crisp, colorful, fast, and plentiful, and the MultiPCM music and sound were rich and deep. Due to the high FPS, games ran fast, and gave a feel of high-powered 3D arcade action!

    Due to being Sega's first cutting-edge 3D arcade machine and having some customized chips, Sega Model 1 hardware was expensive back in the day, and these machines weren't too common in the arcades compared to other games. Due to this, during its lifespan (1992-1995), only 5 games were ever released for the Model 1 hardware:
  • Virtua Racing (1992)
    • A high-speed F1 arcade racing game
    • Launch title
    • Alternate game called Virtua Formula available  
      • Virtua Racing but with cabinet machine linking support
      • Utilizes a special Comm board for linking up each cabinet (ran by a Z80 CPU at 4MHz)
      • Medium sized attraction game
      • 4-8 players per attraction
      • Spectator mode of current multiplayer race
      • "Virt McPolygon" announcer guy
    • Uses a special Motor PCB to handle the steering wheel and force-feedback
    • Game ports
      • Sega Genesis (SVP cart)
      • Sega 32x
      • Sega Saturn
      • PS2 (Sega AGES)
      • Nintendo Switch

  • Star Wars Arcade (1993)
    • 3D Star Wars game
    • Shoot up Tie Fighters in space, attempt to destroy the Death Star from within
    • Game ports
      • Sega 32x

  • Virtua Fighter (1993)
    • 3D 1v1 fighting game
    • One of the world's first major 3D fighting games
    • Game ports
      • Sega 32x
      • Saturn
      • PS2

  • Wing War (1994)
    • 3D aircraft dogfighting game 
    • No home ports available

  • Dennou Senki Net Merc (1995)
    • Rare Sega-VR compatible game
    • Virtual reality land-shmup game
    • Only 70 arcade machines in existence, never officially released to the arcades
    • No home ports available, not emulated in MAME yet
Brief history and legacy of the
Sega Model 1 arcade hardware
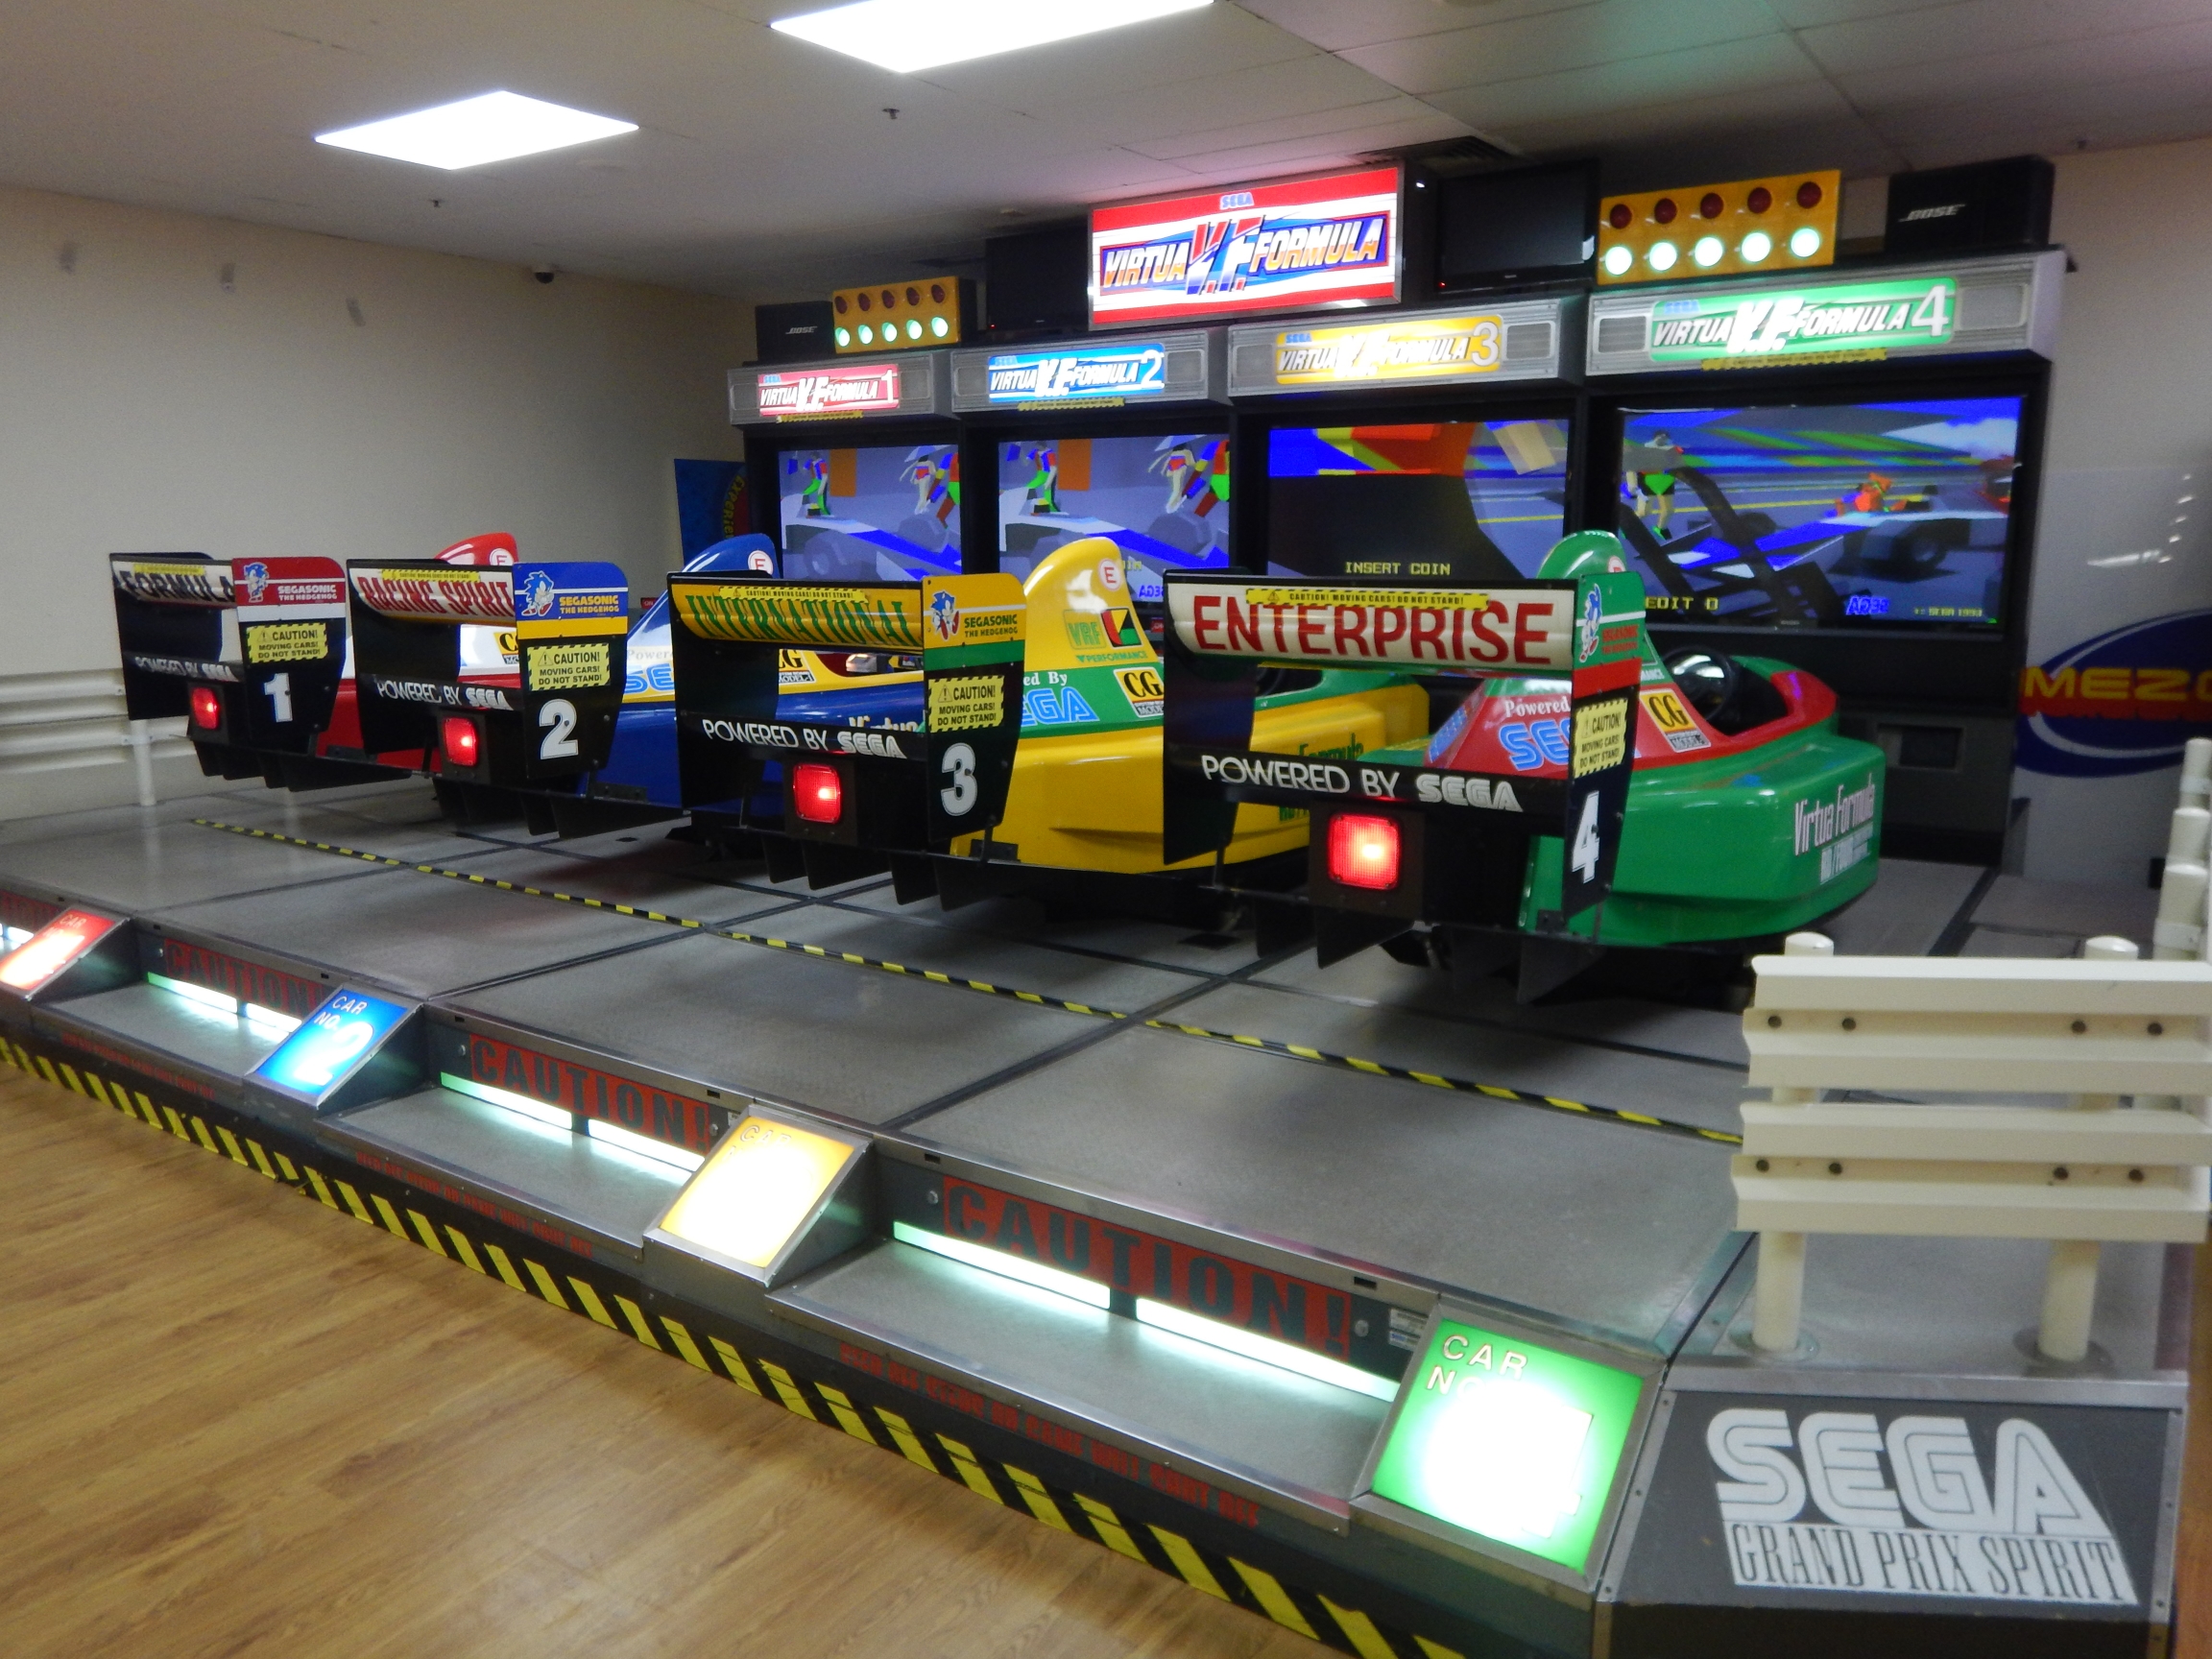
  Virtua Racing and Wing War were unique 3D games for their time, having high-speed driving/flying action, and for having buttons to allow for multiple, dynamic camera views. Both games had multiplayer support. Virtua Racing has a pit section, which has some blocky, bone-rigged characters that animate and perform maintenance on your car, and some characters which celebrate when you win, which were quite cool and creative features for a racing game. Wing War was a 1v1 2P cabinet, while the twin-cabinet version of Virtua Racing was 2P. There also existed a deluxe version of Virtua Racing called Virtua Formula, which was a medium-scale attraction with either 4 or 8 life-sized car cabinets, allowing for 4-8 players to compete against each other in a multiplayer race. These machines could be linked amongst each other (using a unique Model 1 communication board), and had a center screen on top with a spectator view of the current gameplay and a commentator named "Virt McPolygon". Virtua Racing/Formula were the only games to use the Motor PCB board for the Model 1 hardware, which enabled force feedback and support for a racing wheel controller, and Virtua Formula was the only game to use the communication board for cabinet game linking.

Virtua Formula: BIG-time racing!
   Wing war was relatively unique for being a 1v1 dogfighting flight arcade game, while other 3D flight games at the time were just sluggish flight simulator games. Star Wars Arcade was the 1st 3D polygon Star Wars game (excluding the Atari wireframe, color vector-based games), and had a huge sense of scale. Dennou Senki Net Merc was an incredibly rare, Japanese-only VR-based game, which used a Sega VR headset. Only 70 machines were produced, and the game itself isn't fully emulated in MAME yet.

  Virtua Fighter was a 1v1 fighter game, using bone-rigged 3D polygon fighters that animate, and which featured simplistic arenas, realistic movement and physics, and plenty of different fighting moves. Virtua Fighter is cited by most as being the world's first 3D fighting game, and it revolutionized the fighting genre of video games, as well as kicked off 3D animation for bone-rigged humanoids. It and Virtua Racing/Formula popularized the usage of 3D graphics among a wider audience of video gamers and arcade goers, and its pioneering development into 3D graphics led the way to development of texture-mapped 3D during the 5th Video Game Generation (particularly for the Sega Saturn and the Sony Playstation consoles). Virtua Fighter acted as the basic design template for 3D fighting games, and helped inspired such fighting franchises such as Namco's Soul series, Tecmo's Dead or Alive, Namco's Tekken, and obviously Sega's own Virtua Fighter series.


Virtua Fighter gameplay
(real Model 1 hardware)


The Craigslist Virtua Fighter board

    Back to the original topic, according to the Craigslist ad for the Virtua Fighter board, the owner said that the PCB board stack powers on and works, but that the "polygons disappear". Also, the listing was just for the 3-board PCB stack itself (no other boards, power supply, or wiring harnesses). The 3-board stack consisted of the following subboards:

  • Model 1 Memory BD
    • This board is the game ROM data itself (Virtua Fighter)
    • Sega part no. 834-10170
    • Smaller, top board
    • Board which contains
      • PROM chips
      • A few EPROM chips
      • Chips types
        • AMD AM27C1024
          • PROMs
          • 40-pin chips, DIP40 package
          • 16-bit
          • 128 KB
          • Virtua Fighter game code/data
        • ST Micro 27C040
          • Some EPROMs, most PROMs
          • 32-pin chips, DIP32 package
          • 8-bit
          • 512 KB
          • Virtua Fighter game code/data
        • ST Micro 27C160
          • PROMs
          • 42-pin chips, DIP42 package
          • 16-bit
          • 2MB
          • Virtua Fighter polygon data

  • Model-1 CPU Board
    • Sega part no. 833-10016/833-10169 (middle board)
    • Sega part no. 837-7864-02 (bottom board)
    • Boards which contain the Model 1 hardware itself (Video and NEC V60 CPU)

   I figured for the low price, I would pickup and purchase the Virtua Fighter ROM board (which I happily did, for $25), begin gathering the other components online needed to assemble a working VF Sega Model 1 arcade machine, and repair the video issues (if any). Since I do not currently live at my own, permanent place (and thus don't have the room for a full-sized, upright arcade cabinet at the moment), I would be looking into consolizing the game into a wooden box, with long, wired arcade stick boxes for controls. The seller and I chatted, and he had this spare board due to the one in his working VF machine going bad. He tried replacing it with this one, but it had the issue of polygons disappearing; he ended up replacing the board with another which worked perfectly, but was selling this spare one due to the polygon flaw. Hopefully the polygon issue will be easy to detect and to fix!


    During the trip home, I stopped at a nearby yard sale, and found a super rare NeXTCube computer and B&W MegaPixel monitor, many old Linux, Sun, and Digital Equipment Corporation (DEC) tech documents and discs, and what appears to be development hardware of a networking device from DEC, all for $10. I believe the sellers at that yard sale were the family of the owner of the equipment (the original owner I am very sure was a senior ex-DEC or ex-IBM employee with diabetic problems). (That pickup/repair log of the NeXTCube and other items from the yard sale to be discussed another day in an upcoming blog post 😀. )

The Potential PAL Problem

    Once back home from the trip, a premlinary Google search on my part found a few forum posts mentioning that early Model 1 boards (especially Virtua Fighter) have a tendency of the solder joints breaking off on some of the TGP chips, due to the manufacturer using not enough solder on the chips' pins, and causing the polygons to disappear once the solder joints get loose. One thing I did notice after I got home, unfortunately, was that there was a sticker on the CPU board reading "PAL.A", which could mean that this board might be an "A" revision meant for PAL regions (50Hz PAL vs. NTSC 60Hz video used in the U.S. and a few other countries). After emailing back the seller asking if this board were PAL (and if it perhaps the polygon issues were due to him mixmatching a PAL board inside an NTSC machine), he replied that the board is "probably" PAL. If the board is indeed PAL, this will probably make assembling a working Virtua Fighter arcade machine harder, since I'll probably have to get matching PAL components for the other subboards used by the Model 1 hardware, as well as power and video region converters to get it to work on the US's power standards and with the NTSC-U video standard of my monitors. (I unfortunately live in the United States.)

50Hz PAL is not my pal

    One fact I cannot seem to verify through online research is if Model 1 machines really have separate PAL or NTSC versions of machines for all games like with game consoles, and if so, how badly do parts between the 2 regions differ. MAME for example only has one Model 1 game that has ROM dumps for different regions in the Good MAME romset (separate Wing War ROMs for US, Japan, and World, with assumed video formats on my end of NTSC-U, NTSC-J, and PAL respectively). However, the Sega Retro page for Virtua Fighter shows 3 different release dates/prices for Virtua Fighter (October 1992 for both Japan and Europe, and just the year of 1992 listed for US), so it's possible there are 3 different regions of hardware for the game (unlikely). Perhaps not all region variations of Virtua Fighter have been dumped for MAME yet; either that or the same hardware was released for all 3 regions (at different dates) and shipped with arcade CRTs and hardware that all run at the same frequency and video standard (possibly 60Hz NTSC), with just a different power supply shipped to step up/down the voltage/current from the country's power standards to whatever specs the machine needs. If indeed there is only one variation (universal hardware for all regions), then the separate WingWar ROMs are probably just slightly different ROM sets with language/localization changes. In fact, a quick differencing between the 3 ROM configurations from the current version of the model1.cpp driver in MAME just shows 2 ICs changed between all 3 revision

WingWar region differences
Only 2 IC checksums changed


  The Hardware Hunt

Assuming there isn't a thing as different region hardware for Model 1 games (requiring different region hardware components), in order to get the machine up and running, I will need to gather other Model 1 hardware components for Virtua Fighter:

  • A power supply
  • Appropriate wiring harness or JST NH connectors to wire all subboards together
  • Controls
    • x2 Happ joysticks
    • 12 buttons total
  • Gonbes GBS-8200 Video converter
    • To convert the Model 1's medium resolution 24 KHz EGA graphics to modern 31 KHz VGA graphics
    • Allows usage of 24KHz EGA graphics on an ordinary VGA monitor


  • Sega Filter Board 839-0629
    • Receives the power supply's main power
    • Filters out interference from other electrical or magnetic devices
    • Has individual JST NH connectors which wire to the Model 1's various subboards
    • Supplies the proper type of power to the various components (3.3V, 5V, and 12V where necessary)
    • Most arcade operators consider them unnecessary
      • Sometimes cause more problems than good
      • However, allows for neat, organized wiring
      • Arcade operators can bypass needing the filter board and just directly wire machine components to the appropriate power voltages


  • Sega CPU Connector 839-0630
    • Interfaces between the CPU board (the 3-board stack I have), and the I/O board, provides power
    • Receives the appropriate voltage power from the filter board (or directly from PSU if bypassed)


  •  Sega I/O Board 837-8936-91
    • Contains a 4MHz Z80 CPU
    • Handles the game's control inputs
    • Uses a JST NH 25-pin connector for controls (white jack on the bottom of pic)
      • This connector is actually 26-pin, with one pin unused
      • Array of 2x13 pins (like an IDC25 ribbon cable port)
    • Uses a different connector for motor PCB (long black connector on the right of pic)
    • Connects to the Motor PCB for Virtua Racing/Formula


  • Sega Sound 837-8679
    • Contains the MuliPCM hardware for sound
    • Each game has separate ROMs containing PCM samples
    • Each game has different sound driver ROMs


  • Sega Soundamp 838-10018

    • Connects to the Sega Sound board and amplifies the audio


  •  Sega Ampmixer
    • Connects to the sound board/soundamp somehow and mixes/amplifies audio?


    •  

  At the bare minimum, just to power up the machine and check out its functionality, I would need to get some sort of compatible power supply, the appropriate wiring, the filter board (nice to have for organized wiring, but optional if I just want to directly wire components up), the CPU connector, the I/O board, and a GBS-8200 convert for the video output (for displaying the medium resolution video on my VGA monitor). (According to this forum post, the I/O board is necessary to boot up the game.) It is possible to boot the game up without sound or controls wired in (it will run, just no sound or controls). Some of these boards are not very common to find online or on eBay and can be somewhat pricey, so I'll have to save up money and gather components over time to assemble a working machine. Despite the costs, assembling the machine component-by-component would be cheaper than buying a complete Virtua Fighter machine in good condition, hence this repair/arcade machine consolization project. Not only is it cheaper, but it is a fun learning process/project too!

  For the power supply, I could get the original one (heavy, expensive, hard to find, has a weird connector), or I could utilize a standard PC ATX power supply (much easier to find and cheaper). A supplier online used to produce a Sega PSU to ATX adapter, but unfortunately, it doesn't seem to be manufactured anymore. Post #2 in this forum thread has the power pinout from the filter board, as well as some information on a guy's power attempt with an ATX PSU. The power supply would need to be adjusted to apply the correct amount of power wattage and current (not all ATX power supplies can supply the beefy power needed for Model 1 games without cranking the power up, according to the forum thread), and I would need a breakout board for the ATX power wiring (such as this one from RetroElectronik). Fortunately, I've already picked up a cheap ATX power supply from a thrift store, and will just need to make sure it works reliably. The board I have will need 5V supplied to it at a certain power spec for testing its operation.

Moar ATX powa for your ($5) bucks

 ATX Power Supply
Cheap ATX Power Supply + breakout board
+ Model 1 arcade machine = epic win!

    Since I'm making the fully assembled machine as a consolized arcade machine, all of the hardware (model 1 components, ATX power supply, GBS video converter, and wiring) will be housed into a wooden box I'll cut out and assemble. Model 1 machines use a 25-pin connector on the I/O board for the game's main controls. (The connector is actually an IDC26 connector with one pin unused, and is arranged in an array of 2x13 pins. This type of connector is common with wiring up external 25-pin parallel ports to vintage PC motherboards.) The last post in this forum thread has the pinout for Virtua Fighter. For my consolized arcade machine, I'll be placing the controls for each player into smaller arcade-stick styled boxes, which will connect to a custom interface box via an IDC26 ribbon cable.

    This interface box will contain a simple custom circuit with 2 IDC26 input ports (one for each player), and 1 output IDC26 port. The circuit will perform a logical OR between each input port's signals, pin by pin, and will output the resultant control signals to the I/O board's 25-pin input control port. Since each control is wired to only one input switch, one input for the OR gate would always be logical false (0), while the other may be logical true (1) if pressed. (0 OR x) = x. (Example, there is only one Player 1 Kick button between both players). This interface box would allow a standard connection type for all players (IDC26), without doing any funky wiring, and make the wiring simple. Ideally I would use XOR gates for the circuit (since there is only 1 type of each control), but I already have a few OR gate chips handy and they are cheaper/easier to use than XOR chips. Furthermore, I could use this box in the future for additional model 1 arcade games or other machines with a JST 25-pin I/O input port in the future; just wire up different controls and send them over a IDC26 ribbon cable to the interface box. The interface box would be modular, reusable, and useful. Just for fun, I'd also color code some of the controls for my Virtua Fighter machine, based on the player and control type (colors from the Sega 32x port's options screen). Maybe I'll end up creating a FOSS PCB schematic of this interface box, fab a few PCBs on OSHPark, and put up a few kits for sale (and call it the Sega JST I/O Interface Box, or S-JIF for short) 😀.

 Common IDC26 ribbon cable
(as seen on parallel port connections
on PC motherboards)


Virtua Fighter controls pinout/color coding

S-JIF Circuit idea
(Virtua Fighter wiring)


Checking the Craigslist VF board for bitrot

   Unfortunately, I cannot do anything with the Virtua Fighter board from Craigslist right now until I get the minimum amount of components ordered needed to boot it up, and then afterwards I will need to verify and look into that "polygons disappearing" problem. Also, only then will I know for certain if the board is indeed PAL and may require PAL-based components (assuming that is even a thing with Model 1 arcade machines). If the polygons issue is due to faulty solder connections on some of the TGP chips, I'll probably have to end up getting an arcade repair person to resolder the chip downs. (I suck at surface mount soldering, and there is no way I am attempting that on a valuable, vintage arcade board I got for dirt cheap and risk ruining the board.)

    In the meantime, I can use my handy GQ-4X4 multi-chip programmer (and ADP-054 16-bit chip adapter) I picked up during 2016 to dump the game's ROMs off of the Model 1 Memory BD, and compare their checksums against the ones in the Virtua Fighter ROM set in MAME. This would allow me to do the following:
  • To verify what revision of the game I have
    • Check if I do indeed have a "PAL.A" revision of game (if such a thing exists)
      OR
    • Check if I have some mysterious undumped revision of the game

  • To check for bitrot (if this game is indeed a known revision)
    • Compare checksums between my dumped chips and MAME's for Virtua Fighter
    • Burn new chips for bitrotten chips
    • Rule out bitrotten ROMs as the cause for the polygon issue

The venerable USB GQ-4X4 multi-chip programmer
with 16-bit EPROM adapter:
Chip Overlord!


    Do recall that Sega Model 1 machines are relatively "old" (from the early 1990s). Although PROM mask chips can hold their data for a very long time, they don't eternally, and will begin losing data over a very long period of time ("bitrot"). EPROM chips (those with glass windows on top, which can be erased by exposure to UV light and then reprogrammed) can be slightly more prone to bitrot, even with a sticker on top preventing most stray UV photons from erasing data. To determine what revision of board I have and to rule out bitrotten ROMs from causing the polygons disappearing issue, I dumped my ROMs.

After dumping my game ROMs and comparing the checksums against MAME's only known dump of the game, curiously enough, the Virtua Fighter Model 1 board I have matches 1:1! This means the PCB I have may not be a unique revision or a "PAL.A" version as labeled on the board. (And if it is indeed some type of PAL revision, it uses the exact same game ROM data as in MAME. If the board does differ, it could differ with the other GAL and TGP chip ROMs on the other boards on the stack I didn't bother try dumping, due to surface mount components and other pains.) This fact reduces my doubt of this being a weird "PAL.A" revision, but doesn't eliminate them. Another thing to remember is that the Craigslist guy was able to boot up the game in his machine, but then ran into the "polygons disappearing" problem. Assuming he wasn't trying to put this dubious "PAL.A" version into what probably was his own NTSC machine (if regions even exist for Model 1 hardware, which I doubt), this meant it booted up and was playable (albeit with disappearing 3D polygon graphics). Either that, or the board I got was some type of Frankenstein board: a "PAL.A" board with NTSC roms inserted. Another possibility is that the "PAL.A" label could just be an indicator from Sega meaning that this hardware was sold within PAL regions; the hardware is exactly the same as all other regions.
 
   Dumping these chips with my GQ-4X4 multi-chip programmer and with my ADP-054 16-bit adapter were pretty easy, once I figured out what chip settings to use for reading them; fortunately for me, 2 out of the 3 chip types (the EPROM types) had their exact chip ID type printed on them. The 3rd type (the 42-pin ones on the right side of the board, which stores 3d polygon model data) I had to guess.

    For anybody reading this post who has a Virtua Fighter or other Model 1 game and wishes to dump their own ROMs with this programmer/adapter, refer to the Model 1 Memory BD section under the "The Craigslist Virtua Fighter board" section of this post for settings to use for dumping. I'm assuming you know how to use the USBPrg software and general knowledge on how to use this programmer. Just align the chips at the bottom of the appropriate ZIF socket (with ADP-054 16-bit adapter in use as applicable), make sure the alignment notch of the chip is facing towards the top, and read it with the appropriate chip type set in USBPrg. If any chips end up being bitrotten, just replace with the same type of EPROM chip as listed, and burn the appropriate rom image from MAME.


 Chip dump settings for Model 1 hardware
(GQ-4X4 programmer with ADP-054 16-bit adapter as needed)

   Unfortunately I made the stupid mistake of second guessing myself on what type of chips were in the purple section when reading my first one. I was assuming they should be read as a generic ST Micro 27C160 (2MB 42-pin) EPROM, but was stupid and tried making a new chip profile for a Fujitsu "8316200 16M mask ROM (DIP42)" as reported in MAME's Model1.cpp driver. That was a big mistake, and trying to read the mpr-16102.32 chip like that ended up killing the chip with random $00s and $FF data (oops)! I'll have to replace that one with a 27C160 EPROM chip and burn the new image to it when I begin gathering my other Model 1 parts 😞.


What's Next?


    Picking up this cool Sega Model 1 arcade machine with Virtua Fighter was crazy for the $25 cost! My first in-progress Sega arcade machine 😀! After picking it up, I learned a ton more about this system's computer architecture and general information about it through online research (NEC V60 CPU with custom TGP chips for 3D rendering, OPL4 MultiPCM sound hardware, medium resolution video hardware, etc). Unfortunately, it is just a 3-board PCB stack (VF game with CPU/video hardware), and it is missing other Model 1 arcade components and wiring harnesses to assemble a complete, working VF game.

    After gathering the minimum amount of Model 1 arcade parts needed, wiring, and my ATX power supply breakout board, the next step will be to try and wire it up correctly, and then boot it up for the first time within my posession of the game. This part will be tricky, since the information on the proper wiring of VF and Model 1 hardware online is scarce. (There are some forum threads linked in this blog post to help out with that, but the information is still rather scarce). After it is booted up, I will then be able to verify for certain if this board is some weird "PAL.A" revision, and then witness first hand the issue with "polygons disappearing" that the Craiglist seller reported on the sale ad. Hopefully I will be able to identify and to fix whatever is causing that problem, whether that be due to some TGP chips having faulty solder joints or something else altogether.

   After the basic board setup is wired up and the polygons issue is fixed, the final step to complete this arcade project would be to wire up the remaining hardware (sound hardware and controls) and put everything into a wooden box, for consolization. I will design my own Sega JST I/O Interface Box (S-JIF) circuit to handle custom controls wired up to IDC26 ribbon cables, and then design both arcade fighting stick controllers for the S-JIF circuit. After everything is complete, I am thinking about researching into doing a simple ROM hack of the game within MAME (and then testing code out on the real hardware with newly burned ROM chips). This ROM hack would consist of adding the unused characters as new entries into the character select screen, as well as possibly implementing other unused content from the game. I'll probably call the ROM hack Virtua Fighter DX  😃.

   Stay tuned for the next post in this arcade repair log, Virtua Fighter Arcade Repairs, Part II: Bootup !


Enabling telnet on a WNR2000 Router (OpenWRT install)

Enabling telnet on a
WNR2000v4 Router
(OpenWRT install)

Background:

   During late 2018 due to reasons, I temporarily moved back home into my parents' basement to look for better game development employment elsewhere while working at a few temp jobs. Previously I was living with my great roommates in an apartment, and fortunately my room was close enough to run a 20ft or so long Ethernet cable from the ISP's router to my room for Internet. Earlier in 2018, back at home, my father "upgraded" the shady Comcast router with a shadier, newer one, and gave me the old router, a Netgear WNR2000v4 router. At the apartment, I used this router as an overglorified network switch for the devices in my room, for giving Internet access to my laptop, a legacy PC, or any older video game consoles or devices that required wired Internet. I also prefer a wired Ethernet connection over WiFi when I can, since it can be more secure and have less overhead (faster and more reliable) than dealing with wireless Internet. Unfortunately, since this was a 2-router network setup, the network was somewhat complex (outer ISP router being on a 192.168.x.x subnet, with my inner router being on a 10.0.x.x subnet). This 2-router network prevented things such as connecting the PS2 versions of Star Wars Battlefront 1 & 2 to SWBFSpy (which requires getting an IP whitelisted by the server's admin for usage).

   Unfortunately, when I moved back home into my room, I didn't have the privilege of having wired Ethernet available, due to the ISP's router being on the other end of the house from my room and my "roommates" not going to like having a 50+ ft. length of Ethernet cable running across the houses to the ISP's router. This obviously wasn't a problem to give Internet access for devices that can use WiFi, but definitely one for devices that only have a wired connection (such as those older video game consoles). Most modern day routers have a web-based GUI for configuring the router (by connecting to the default router gateway in a web browser and logging in as the admin); the WNR2000v4 was no exception. Unfortunately, the default gateway's GUI (called "Genie" by Netgear) for this particular router model does not have a wireless bridging feature, just basic router functionality (via Ethernet or WiFi) for an Internet connection and network switch functionality between wired devices. Getting a wireless bridge function working would allow me to connect devices via wired Ethernet to my room's router and then forward the network data wirelessly (via WiFi) to the main router on the other side of the house. This would allow wired Internet connections from my room to connect to the Internet, and would additionally make the network appear as a single-router network from my router's perspective (with a single subnet; not having to use 2 subnets like at the apartment). Rather than wasting precious money on a dedicated wireless bridge to solve my problem, I was resourceful and used my brain instead, looking into hacking my spare Netgear WNR2000v4 router to install OpenWRT.


Telnet enable attempt/Installing OpenWRT

   For those whom are unaware, OpenWRT is a lightweight Linux distribution meant for embedded devices (especially routers). Installing OpenWRT as a replacement firmware on a router removes any restrictions with the stock firmware, and allows full control of the hardware, as well as beefed up security. Basically it can turn any router into a fully configurable business one (with telnet, VLan setting up, etc), just like the Cisco ones my classmates and I learned about in my networking class at college. Most importantly, OpenWRT has a few packages that can be installed to enable wireless bridging functionality on this router. This would solve my problem of connecting my wired devices to the ISP router on the other end of the house without using a double-router setup with 2 subnets and a very long Ethernet cable.

   Unfortunately, the stock firmware on the WNR2000v4 has its telnet feature locked. To summarize the basic process of installing OpenWRT on router devices, you need to telnet into the router (using software such as PuTTY) and flash the device with the new firmware. This file is sent to the router via a TFTP server on a computer, and the flashing is done through a Linux console on the router by running some Linux commands. Most Netgear routers have the telnet locked for security reasons, and in order to unlock the telnet, a special packet usually must be sent either over UDP or TCP (depending on the particular router model). Usually a special program is used to send the magic packet and unlock the telnet. More details about unlocking the telnet on Netgear routers can be found on this OpenWRT article, and full details about installing OpenWRT on the WNR2000v4 router (including an UDP telnet enable python script) can be found on this other OpenWRT article under "How to Install OpenWRT on the Netgear WNR2000v4 through u-boot-env modification on Linux" section.

  Also unfortunately, neither the UDPtelnetenable.py script worked within a Linux virtual machine, nor did any of the telnet enable programs for Windows in the other article were able to unlock the telnet on my router. Perhaps my particular router unit was a newer hardware revision that blocked telnet enabling altogehter, or some other weird networking issues were preventing the packet from being sent/received and properly unlocking the telnet. Fortunately, while doing a Google search about my problems, I came across a security vulnerability (CVE-2016-10174) for the similar WNR2000v5 router, which, when exploited, can allow an attacker to bruteforce the admin password, enable telnet, and then gain a Linux root console access. These privilege escalations through the exploit are a pretty serious security vulnerability, and you really should replace this router with a more secure one if you wish to use its stock firmware (or do the smart thing and replace the firmware with the much more secure OpenWRT like I'm doing). A person online also wrote up details about the security vulnerability and a PoC hack here. Most importantly, a formal exploit was published and included with the Metasploit framework for white hat hackers. This security vulnerability is confirmed to exist and to work on the v5 router, but only has static analysis to show possible existence on the v4 and v3 routers. Using this exploit to enable telnet and gain the Linux root console access, I could properly install OpenWRT fully without relying upon the broken telnet enable programs that weren't working for me. Since I know the admin password to my own router, I could bypass the password bruteforcing, and just use the exploit to enable telnet/gain Linux root console access, speeding up the exploit process.

Enabling Telnet the hard way
via the security exploit

    Since none of the UDP telnet enable programs were able to properly send the magic packet and enable telnet, I decided to enable telnet the hard way, by bruteforcing telnet enable and gain a root Linux console through the exploit. I did this through installing and using Pentestbox with Metasploit. Fortunately Metasploit has a penetration module to run the exploit on the WNR2000 series of routers; instructions and details on the module usage here. I also had to upgrade my router to firmware 10.0.0.58, which is required for installing OpenWRT (see the main OpenWRT install article for this router for the stock firmware link). If I remember correctly, basically I logged into my router's gateway interface (Genie) via the admin password (in order to get the timestamp from the router for the exploit), and then immediately ran the Metasploit module on the page that confirmed access was granted, and was able to get temporary telnet enable and a root Linux console access on the router after the exploit successfully ran. Then I ran all of the normal OpenWRT installation steps for the WNR2000v4 router (setup the TFTP server, send the OpenWRT firmware, run the Linux consoles commands to flash the firmware, etc).

  After all of this was done, I got OpenWRT installed on my spare WNR2000v4 router, and proceeded to setup wireless bridging to solve my original networking problem. So now this router has wireless bridging functionality, and a much more secure firmware (OpenWRT) without nasty, inexcusable security vulnerabilities like CVE-2016-10147. This installation also proves that the vulnerability exists and that the exploit does indeed work for not only the WNR2000v5 router, but also for the v4 router. (Meaning you really should replace this router if you have one or install the much more secure OpenWRT firmware on this model.) Hopefully anybody who runs across the same issue I had with being unable to unlock telnet for an OpenWRT install on a WNR2000 v3-v5 router with the special magic packet programs will find this article useful, and use the security vulnerability method to bruteforce telnet enable/root Linux console access as a last resort.

-Tamkis

Socket the Hedgeduck Progress: FZ & TCZ

Socket the Hedgeduck Progress: FZ & TCZ


  After nearly a 2 year hiatus (due to professional gamedev work), development on the Socket the Hedgeduck mod for Sonic 1 has resumed! Recently, Future Zone Acts 2 and 3 have been finished, as well as the entirety of the final zone, Time Castle Zone. A planned v0.4a demo will be released later this year and submitted to the 2019 Sonic Hacking Contest, after more polishing, bugfixes, and improvements will be made to the game.


    Future Zone acts 2 and 3 were previously empty, due to figuring out a way to implement the reverse-gravity gimmick used in the original game for act 2. After a few failed attempts at porting S3K's reverse-gravity gimmick to Sonic 1 (which would have been a high cost, low benefit feature to implement, due to only one level requiring it), I used some out-of-box thinking to implement the feature. Instead of vertically flipping Sonic's gravity and physics, why not vertically flip the entire level around Sonic 😮?

    Behind the scenes, in code, instead of implementing S3K's reverse-gravity gimmick, hitting an activated gravflip bridge instead transports Sonic between FZ2 and FZ4 levels, very similarly to the inter-level warp doors in Olein Cavern Zone 2 (OCZ2) or the boss doors in act 3 of each zone. (I call the types of warp doors that transport Sonic to a different location within the same level "inter-level warp doors".) FZ2 is the normal version of the level, while FZ4 is a copy of FZ2 that is vertically flipped (has vertically flipped level chunks and y positions of  objects mirrored about the level's middle y midpoint). The only difference in the warping functionality for the gravflip bridges is Sonic's new warp position. Sonic's new x position is kept the same, while his y position is calculated to be a new one mirrored about the levels y midpoint. This creates the illusion of gravity flipping. Similarly to the Bonus Fence Zone (BZF) levels, where pressing A button while in Debug Mode will send Sonic to the background layer for collision, pressing A button while in Debug Mode will send Sonic between FZ2 and FZ4 levels to implement the "gravity flip".

   Act 3 for each Zone is a unique remix I create using the existing chunks from the other 2 acts, since the original Socket game only has 2 level per zone (excluding High Speed Zone (HSZ) levels). Due to the fact that the Sonic engine (and Socket engine) use large 256x256 px chunks instead of Sonic 2 and later's more flexible 128x128 px chunks, these levels are usually remixed sections of the 2 previous acts, with a few unique chunks I design sprinkled in between to connect sections for smooth level graphics and layout flow. Unfortunately, gravity flipping act 3 would have consumed more than the zone limit of $FF Big ROM Chunks, so the reverse-gravity feature was only designed for act 2. All act 3 levels (except TCZ3) have a boss warp door leading to a boss area.

 FZ3 is an extremely difficult remix of acts 1 and 2, with a ton of traps, surprises, and difficult obstacles, and might actually be the hardest level in the hack. The final section of the level consists of a Labyrinth Zone (LZ)-styled wind tunnel, inside a few huge glass tube chunks. Sonic must float upwards and downwards to avoid painful torpedoes (the same ones as used in Antiquity Zone (AZ)), horizontally moving spiked blocks, collect rings, and cling onto Satebô BS-X Satellaview satellites. (These satellites have the same behavior as LZ wind tunnel poles). The level ends with hitting the boss warp door, which leads to the boss area and a to-be-implemented boss.

FZ1

FZ2

FZ3


  The entirety of Time Castle Zone, the final zone in the game, recently also has been finished. This zone was sitting at approximately 95% complete during the hiatus, and was just waiting on fully implementing 2 new custom objects (the hamster belts and clock platforms). This zone features some custom objects such as:

  • Beam bridges
    • Hit a button on the object, which unfurls a temporary solid bridge
  • Hamster belts
    • Operates like Metropolis Zone (MTZ) nuts in Sonic 2, but horizontally
    • Moving on the object will lock Sonic's position onto the belt
    • Moving Sonic left will move the hamster belt and Sonic right, and Sonic right move belt and Sonic left
    • Hamsterbelt will stop moving when it hits a wall either to the left or right
    • Makes squeaking noises as the object's art updates frames
  • Clown faces
    • Painful objects that rotate clockwise, counterclockwise, or upside down in either rotational direction
  • Clock platform
    • Platforms that rotate clockwise on clock faces in the level
    • 2 variants
      • Platform with a shorter radius that moves slower (hour hand)
      • Platform with a longer radius that moves faster (minute hand)
  •  Crusher blocks
    • Purple blocks that oscillate up and down, attempting to crush Sonic in various areas of the level
  • Collapsible platform
    •  Standard Sonic 1 collapsible platform, just updated graphics for zone
  • Runaway Saws
    • Standard Sonic 1 saws and pizza cutters object from Scrap Brain Zone.
    • Only runaway version used, with updated graphics
    • Same objects as used in FZ
 TCZ1 is a rather basic (but difficult) level, introducing the player to this zone's gimmicks. TCZ2 is a difficult labyrinth, and is the only level in the original Socket game to feature two bonus stage doors. TCZ3 is a remixed version of TCZ1 and TCZ2, with bottomless pits and a more difficult level layout. Currently TCZ has an odd memory leak bug somewhere where having too many clown faces and chained spikeballs on screen will cause the game to start corrupting object SSTs, not loading new objects, crash the game, or begin running arbitrary code. This bug happens often in TCZ2, and the bug will be investigated and fixed before the upcoming demo release. In the game mod's extended playlist, each act in TCZ features a song for both the bad ending (not having all 7 chaos emeralds) and the good ending (having all 7 emeralds). Some of these songs are currently WIP, while others are completed.

    TCZ goes over Sonic's original Scrap Brain Zone (SBZ) level slot. The original Sonic 1 game has a SBZ3 level which is actually a Labyrinth Zone (LZ) act 4 level. The real SBZ3 level is Final Zone, and is actually just SBZ2 but starting at a further level position and having the boss implemented. I found this setup to be BS, and undid it completely. (I call this the "Anti-SBZ3 BS feature".) TCZ3 is a real level in this mod. TCZ doesn't have a boss; the next and final zone (a 1-act Time Lord Zone (TLZ)) does feature the final boss, the evil Time Dominator! Time Lord Zone is technically SBZ4 in this mod. It uses some extra chunks from SBZ3 and a new palette for the level. This is a far more acceptable setup for the final zone than the SBZ3/LZ4 BS in the original game 😀.

  TLZ is currently just a level layout, with no final boss yet implemented. Like with TCZ, this level has both a good and bad ending song. I have plans down the road possibly to implement some cutscene screens in the game, replace the emeralds with Sonic CD Time Stones, and to explain a backstory as to why Sonic is in Socket's universe and as to why he is fighting the Time Dominator. In the bad ending, you just fight the Time Dominator; in the good ending, you fight both the Time Dominator and a brand new boss.


     Other changes behind the scenes include refactoring the mod's original warp system to fix screen tearing and BG deformation issues. Inter-level warp doors no longer clear object RAM. This means you can no longer use warp doors and continuously farm up on rings by having them respawn. Sonic is the only object destroyed, and then reloaded with a new warp position set (classical quantum teleportation lol).

  With both FZ and TCZ complete, all of the levels for the hack have been implemented 😀! All that is left to complete this hack is to fix bugs, polish the game, and to implement the remaining bosses.


   Stay tuned for more development on Socket the Hedgeduck this year!

-Tamkis

Thwimp v1.1 Update!

Thwimp v1.1 Update!


 Thwimp, the modification utility which allows one to view, to rip, and to encode Nintendo THP video files from/for Mario Kart Wii, has been updated to v1.1 today!

   This new update fixes a few bugs from the initial release (proper framerate not being applied to newly encoded THP video files, and improper ripping of the control BMP frames from battle_cup_select.thp), as well as refactors the THP Viewer/Ripping section! When cropping THP videos for ripping, users can now click radio buttons to select a subvideo cell to crop to. The section now includes a start/end frame field, for selecting a time period at which to clip the video to. A numeric up/down control has been added to select from which multiplicity time period for ripping subvideo frames from. Furthermore, the user's manual (on the Github page) has been updated with images, better spelling/grammar, and updates. Most importantly, an article for the application has been added to the Mario Kart Wiiki!


 You can view the changes with the THP Viewer/Ripper in this update video.


  I had been holding off on writing a MKWiiki article for the application until this v1.1 update was released. This application was quite challenging to write, due to the idiosyncrocies involved with the command line params for FFMPEG. I'm quite pleased with how this application turned out. Hopefully MKWii modders will find it quite useful for creating new THP videos for their menu-based THP files!

  You can download the application either from the Wiiki article, the Thwimp webpage, or get the source code from the Github page.

Enjoy!

-Tamkis

Hover Pack Release!

Hover Pack Release!


   After about 3 or so months of work during leisure time, Hover Pack has been released for Mario Kart Wii! During the past month, all tracks have been finished, and polished with some bugfixes and some visual enhancements have been added. Furthermore, the pack has been enhanced with custom graphics (making the game more Windows 95/Hover themed), new THP videos, many custom songs, and even a custom Hover Item Pack! This pack replaces all of the items used in the game with some new ones.


   The pack, item pack, and individual courses can be download from the project page (which link to MKWiiki articles where the downloads reside). A future update will be made to address some issues in the new content later.

--Tamkis

Thwimp utility released / Hover Pack project announcement

Thwimp utility released / Hover Pack project announcement


   Lately, I have been looking into modding Mario Kart Wii on the Nintendo Wii, with My Stuff files in Riivolution. Specifically, I have been working on designing a pack of custom battle courses, ported from the mazes in Microsoft Hover! (1995), called "Hover Pack", with an additional track being a port of Arena Rumble from Monster Truck Madness 2. Currently, maze 1, maze 2, and maze 3, and the Easter Egg Credits Maze have been ported, and are all done other than adjusting enemy route widths. The pack (when released), will include a new title screen, sound effects from Hover, music from Hover, some custom music, new THP videos for the tracks (created with Thwimp), the new battle courses themselves, and "Flag Grabbers" mode (modified Coin Runners mode with Microsoft Hover flags to capture). You can view the current progress at this YouTube playlist.

    While creating Hover Pack, I created new THP video files. These video files are used in the menus, title video, and ending sequence. Unfortunately, most of these THP files are actually an array of subvideos inside (with a multplicity of subvideo per frame), are all of equal frame length, and are quite complex to create manually. Some actually include padding (THP videos' dimensions must align to the nearest 16px boundary), and sometimes this padding including what I call a "control signal". This signal is usually a white rectangle in the padding, which moves to an integer position at each multiplicity, in order to tell the game which row to highlight in a menu during THP playback.

   With all of these problems with manually creating THP video files, I have create and released Thwimp utility!

    Thwimp is a Windows utility which allows users easily to view, to rip, and to encode Nintendo THP video files for Mario Kart Wii. Written in Visual Basic (from Visual Studio 2010 IDE), the Thwimp application calls some FOSS and other command line tools (not included) "from arms length" via the Command Prompt to perform its tasks. For encoding new THP files, Thwimp can intelligently handle audio, subvideo array, multiplicity, and padding/control information when encoding THP files to replace ones in-game. It does this by accepting appropriately named, input mp4 video files for each subvideo cell in the array, and for each multiplicity. It will also accept a WAV audio file, and BMP image frames for each multiplicity padding/control signal as needed. After reading the input files, Thwimp will intelligently process and splice all of the files together appropriately in order to create a high-quality, properly formatted THP video replacement file!

    Today, I have updated the EagleSoft Ltd webpage with a new Nintendo Wii section, a Thwimp page (where you can learn more about the utility and download it), and Mario Kart Wii Tracks page (to host all of my incoming new tracks) .

  I hope people find Thwimp useful for THP editing!

-Tamkis

Coffee Crisis Release (PC, XBox One)

Coffee Crisis Release (PC, XBox One)!


   Many people might have been wondering why EagleSoft Ltd hasn't been as active lately since about 2017. The real reason has mostly been life, and starting a new job as full-time Indie video game developer at Mega Cat Studios! Mega Cat Studios is a local Pittsburgh company, that creates Indie video games for modern and retro platforms (such as for Sega Genesis, NES, SNES, and others).

  From 2017 to mid-2018, I was developing for the company the port of Coffee Crisis to next-gen platforms (PC on Steam, and Xbox One) as lead developer, while collaborating with our other teammates. Coffee Crisis is a retro, 2D side-scrolling fighter game, similar to Streets of Rage. The Smurglian alien race has come to Earth and they’re not leaving until they steal our four most prized commodities: metal music, the best coffee, cat videos, and all the WiFi. Challenge them through unique and innovative levels inspired by real-life areas in Pittsburgh, PA. Join Black Forge Coffeehouse baristas Nick and Ashley, two galaxy gladiators called to arms to stop this madness and remove the Smurglian threat from Earth. The Smurglians can have the cat videos… but if you don’t help our heroes fend off against the alien-assimilated elderly, bros, cowgirls, and country western singers, who knows what could happen!


  The game features 1P and 2P local Co-op, 2 different players (Nick and Ashley), weapons, many fighting moves, powerups, and much more! These ports not only contained the content of the original game, but new enemy types, tons of visual-eye candy, Finish Them Zone modifiers, new bosses, new levels, and tons of improvements over the original game. After a year of many development twists, turns, technical difficulties, and collaborative teamwork, the development team and I at Mega Cat Studios have finally released Coffee Crisis, both for PC on Steam for more recently for XBox One!

  You can learn more about the game at Mega Cat Studio's Coffee Crisis webpage. The PC version (including a demo) can be purchased/tried at the Steam store page, the soundtrack at the Steam DLC page, and the Xbox One version at the Microsoft Store. The original game for the almighty Sega Genesis can be purchased at Mega Cat's storepage (NTSC version, PAL version), or users can try out a demo in a Sega Genesis emulator. Having a personal Coffee Crisis? Try some Coffee Crisis coffee!


   Stay tuned for official news on progress for other Mega Cat Studio games at their website! The EagleSoft Ltd portfolio webpage (and softography pages) have been updated with info on the release. Both will be updated with other projects I work on at Mega Cat Studios, as games get completed, as much as NDA will allow me to.

-MrTamkis (aka "Eagle")

The Quest for RGB

The Quest for RGB


        During a Saturday in early May 2018 this summer, I was over in the Squirrel Hill area of Pittsburgh in order to stop by to the nearest Get Go for cheaper gasoline for the car. While in that area, I noticed an estate sale going on. Considering estate, garage, yard, and flea market sales have the potential to sell awesome vintage stuff (such as retro video games and vintage technology) for cheap, I decided to stop by and check it out. I'm glad I did stop by; I found treasure that day!

   The estate sale seemed to belong to an older, classy Italian who recently passed away, who had some high-end, retro, AV equipment. The item that caught my eye the most was an old Sony CRT monitor, with a listed sales price of an incredibly affordable $20. Although I've never seen this particular model of CRT before and didn't know exactly what it was at first, it did look quite high-end, and I did notice a "Digital RGB" indicator and a "Sony Trinitron" logo on the front. Apparently this model of CRT could support RGB input, which is the highest quality video that retro video game consoles can output! Although I already had an older CRT which is starting to go bad, I decided to take the risk and purchase it. Also purchased with the lot was a VK-2D Multi-Input Cable for the CRT, and a generic 3.5mm to Component jack cable. This was the 2nd and final day of the Estate sale, so everything was being sold for half-off. (I didn't realize this until after the purchase; otherwise, I would have also purchased the remote and TV tuner that was compatible with the CRT).
 
   The CRT was huge, and weighed about 120 pounds, so a helper at the estate sale and I had to do a two-person lift to haul this treasure into the car. Back at the apartment, I did some research online for what I found. The find was a Sony Profeel KX-2501A Component CRT, which is a high-end CRT manufactured during the 1980s by Sony. It uses a high-end Sony Trinitron monitor, a proprietary Sony technology which reduces the amount of color bleed between pixels. It is known as a "component TV", not because it has component AV inputs (YPbPr), but because it requires external hardware ("components") to fully utilize it. For example, the CRT doesn't include built-in speakers; it has speaker jacks to hook up to 8-16Ω stereo speaker equipment. Furthermore, it is best to use the compatible VTX-1000R TV Tuner with it, which allows hooking up multiple RCA and other inputs to the monitor (such as analog TV on RF), as well as hooking all equipment via a single, optional VK-2D 8-pin DIN Multi Input cable. The CRT also is compatible with the retrotacular Remote Commander RM-205 remote.

The Sony KX-2501a
(hooked up to a Sega Saturn via RGB)

   According to the Vintage Knob, the Sony "Profeel" line of CRTs was Sony's marketing term for their consumer and semi-pro product line of CRTs, with the product line positioned slightly below their fully professional product lines. Their professional product lines were their PVM (Professional Video Monitor) and BVM (Broadcast Video Monitors) monitors. These 3 product lines are highly sought out by retro video gaming and video enthusiasts due to their quality. They utilize Sony Trinitron monitors, high quality monitors which are sharp, bright, and clear. You can learn more about why Sony Trinitron monitors were (and still are) the king of CRT technologies in this informative YouTube video.

    Not only do these monitors contain high quality Trinitron monitors, but most of them have inputs for digital RGB. digital RGB is the best quality AV you can get out of most retro video game consoles. Compared to other inferior AV input types (such as RF, Composite, or S-Video), RGB separates the red, green, blue, and sync information on video into separate signals. The other video input types mentioned combine all or some of the color information into individual signals, instead of separating each piece of information into separate signals. This combining of signals causes much signal interference and loss of color quality and information. RGB, on the other hand, separates each piece of color information into their own wire/signal, preventing any interference, and ensuring perfect color accuracy and quality. This is why digital RGB is such a big deal for video enthusiasts. You can learn more about what digital RGB is and why it is so spectacularly awesome for retro video games at this webpage and at the retrorgb.com website.

Comparison between
lowest quality RF
and high-quality RGB video
(Source: RetroRGB website)

Unfortunately, there was a VTX-1000R TV tuner and the remote for the CRT for sale at the estate sale, but I didn't realize I should have picked it up at the time. I later picked up both for relatively cheap on eBay (but not as cheap as at the estate sale). Dumb mistake!

The KX-2501A monitor in action,
with VTX-1000R TV tuner and Remote Commander

--------------------------------------------------------------------
Getting RGB into this monitor

    As previously mentioned, Digital RGB is the best quality AV input for most retro video game consoles. RGB can be input to most high-end CRTs either thru SCART or thru BNC (RGBHV) connections. SCART is a European standard, and uses a 21-pin connector which carries RGB signals. Few if any monitors in North America use SCART inputs; however, many higher end CRTs have BNC connections for RGB (RGBHV or RGBs), which are more common than SCART inputs. SCART contains both audio and video on one cable, while BNC connections use 4-5 BNC connections for video, with audio via left/right RCA connections.

  The Sony Profeel KX-2501A does support RGB input; however; it neither uses SCART or BNC inputs for RGB, and instead, uses a proprietary IDC34 jack, which looks the same as a 34-pin floppy drive jack (see input panel on above picture). This change in input interface was a big problem with getting RGB input on the CRT. After doing some research online, I discovered this blog post from WaveBeam on how to rewire the pins on a SCART jack into such an IDC34 port for transmitting an RGB signal, as well as a proof-of-concept by another person who got RGB working via BNC+RCA connection. Later I discovered a Ben Heck article on creating an AV switcher circuit using Bus Switcher ICs.
--------------------------------------------------------------------
Enter Sony Super Multi (X) RGB Kits

  With the information researched in those links, I have designed the ultimate conversion interface kit for getting RGB input into IDC34 monitors such as mine. The R&D of the products are in late stage development (about 90% complete), and the kits should be ready to be sold to the public at around early October, after pricing, packaging, and an online store are setup.

    The Sony Super Multi RGB product line of kits will contain two kits: The Sony Super Multi RGB, and the Sony Super Multi X RGB. The former kit is the basic kit, while the latter is the premium kit. Both kits will allow one to interface both SCART and BNC (RGBHV/RGBs+RCA stereo audio) RGB AV into their IDC34 port on their monitor, as well as to use either a standard (twisted) IDC34 floppy cable or a nonstandard one. The main difference between the 2 kits is that the former is a passive circuit and does not prohibit the usage of both SCART and BNC inputs active at the same (attempting to use both will mux both signals to the CRT), while the latter is an active, powered, digital circuit that only allows one input type active at the same time. The latter uses an AV Input source switch to select which input to use, power supply, and a few SMT Bus Switcher ICs to fix the design flaw of the standard kit; however, it costs more and is harder to assemble, due to the few SMT components and more complex design. Both kits will come with color instruction manuals for how to use and assemble the kits. The parts used for the AV inputs will be high-quality, non-oriental parts, in order to ensure a pure AV signal. Both kits will be open-sourced, fabricated at OSHPark, and were designed with Autodesk Eagle. Pre-assembled kits will be tested for QA assurance before shipping.

 SSM RGB Kit
SSMX RGB Kit

Manuals
 -----------------------------------


   Stay tuned for more news about the development of the Sony Super Multi kits, and an eventual release date for the first batch of kits. The source material for the kits and the manuals will be released when the design is finalized and ready to ship. The EagleSoft Ltd website has been updated with a new "Electronics" tab, including a WIP page for the SSM Kits.

DreamPi NOOBS-compatible image updated (v1.1/v1.7)

DreamPi NOOBS-compatible
image updated! (v1.1/v1.7)

  Earlier this year, I released a DreamPi NOOBS-compatible image for Raspberry Pi for the Sega Dreamcast. A DreamPi is a standardized set of software (a customized Linux distro) and a set of hardware created by a fellow named "Kazade" which will create a simplified DC-PC server, for getting a Dreamcast back online to connect to the internet for browsing and online gaming, via resurrected, private game servers. The stock DreamPi image is one which must be written to the entire SD card, and doesn't easily allow a multi-boot setup with other OSes on other SD card partitions. This DreamPi NOOBS-compatible image is compatible with NOOBS or (by extension, the recommended, superior) PINN. NOOBS is a simple bootloader, which allows one to install NOOBS-compatible distro images in such a way as to allow a simple multi-boot configuration, while PINN (derived from NOOBS) is a enhanced version of NOOBS, which fixes some design flaws and adds new useful, convenient features. PINN is recommended over NOOBS.

  The DreamPi NOOBS compatible image works with NOOBS/PINN, and allows one to install DreamPi distro with others in a multi-boot configuration. Recently, the stock DreamPi image was upgraded to v1.7. You can read the Dreamcast Live blog post and forum thread from the previous link for information about the ChangeLog, but to summarize the changes:

  • Updated Firmware
    • Image rebuilt against newer minimal Raspbian distro.
    • Now supports Pi Zero W and Pi 3 B+ models of Raspberry Pi
    • Smaller image size
  • 2K Games support
    • Supports resurrected servers for the supported 2K series of sports games (NBA 2k1/2, NFL 2k1 etc; see up-to-date games list)
  • Wi-Fi Config Utility 
  • Bugfixes
   I have updated the DreamPi NOOBS-compatible image against the updated DreamPi v1.7 stock image. The DreamPi NOOBS guide has been updated to detail how to upgrade your DreamPi partition from an older version to a newer version via the latest NOOBS image, and clarifies a few items. The upgrade requires the latest version of PINN, which has now introduced a "replace" OS function, as well as dual-firmware support to handle Raspberry Pi models 3B+ and newer and also older models. This OS replacement feature will upgrade DreamPi with the newer image, without deleting or modifying other partitions within your multi-boot setup on PINN.


Do note that this image may need the speed bugfix applied to make it boot consistently.

You can download the latest DreamPi NOOBS compatible image and read the guide at this EagleSoft page.

Have fun playing with the new support for the 2k series of sports games, and having DreamPi multi-boot with other OSes on NOOBS/PINN!

-Tamkis

Birthday Bash 2018/Recent pickups

Birthday Bash/
Recent Pickups
(Not a dead hobo yet)


   I and EagleSoft Ltd are not dead! I just have been really busy with my day job as a developer lately. I somehow recently lived long enough to turn 26 years old during April! As usual, I picked up a few video game related items this month in celebration, some homebrew development related, others just video games. Unfortunately, turning 26, I fell off my parents' health insurance. What did I pickup this year?

   Around April, I found a few good games at a thrift store for dirt cheap, and some other great finds at the annual Pittsburgh Retro Gaming Convention (2018)! At the thrift store, I found a boxed copy of the Starter Pack for Skylanders Superchargers Racing for Wii, with Bowser, his airplane, the portal, and the game, as well as a copy of Megaman Network Transmission for Gamecube, and a longbox copy of Twisted Metal for PS1. A future blog post will give a short game review of Skylanders Superchargers Racing for Wii, as well as a quick review video in a future episode of Nerdology.


-----------------------------------------------------------------------------------------
 PRGC/Gamemaster's Realms Pickups:

At the 2018 Pittsburgh Retro Gaming Convention (PRGC) and a recent trip to the local game shop (The GameMaster's Realm), I found some great pickups! 

  • PS2
    • Hw
      • 8MB Memory Card
    • Applications 
      • HDLoader
      • Network Adapter Startup Disc
      • DVD Player v2.10 
    • Games
      • Star Wars Battlefront 1
      • Star Wars Battlefront 2
  • Gamecube
    • BMX XXX (at GMR)
      • Homebrew Game Save exploit!
    • Gamecube SD Gecko (eBay)
  • Sega Saturn
    • Games
      • Virtua Fighter 2
      • Virtua Cop 
        ----------------------------------------------------------------------------------------- 
        PS2 Pickups/FHDB Setup

   Last year, somebody gave me a working Fat PS2. It was fully working, but the CD tray was jammed. I was able to easily fix that by lubricating the drive belt. I also had future plans to acquire a HDD Network Adapter, and to install a HDD with Free Hard Drive Boot (FHDB) and Playstation Broadband Navigator (PSBBN) on it. This adapter would also enable me to play various games online again, via private servers or self-dumped, patched backup discs.

    That same someone also gave me an OEM HDD Network Adapter (with Ethernet and Dialup jacks) on it, so I had been trying to setup my PS2 Fat up with networking and HDD capabilities. Initially, the blank Memory card I acquired at PRGC'18 would be used as the Free McBoot (FMCB) memory card, with HDLoader being the software to use to get over the chicken-and-egg problem of having to write the appropriate files to the memory card on a non-modified console for the FMCB installation, and being the software to use to utilize the HDD. However, the HDLoader disc was badly chipped on a section of disc near the inner ring. Although I tried getting the CD buffed at the Gamemaster's Realm (whose owner has such a professional CD buffing machine), it still wasn't enough to fix the issue, so I ended up returning the disc back to the seller on the 2nd day of the convention. It was a shame too, because HDLoader is a somewhat rare but useful homebrew utility disc, and I found this copy for a steal of only $3.

    A few weeks later I picked up a compatible 40GB IDE HDD for dirt cheap ($10) on eBay, and ended up just writing a modified PSBBN disk image to it ("PSBBN custom install 2013 by AKuHAK" from somewhere online), for a Free Hard Drive Boot (FHDB) installation. More info about what a PS2 FHDB installation can do in a future blog post/Nerdology video.

Formatting the old drive
on the Windows ME DosBox

 Powering up the HDD
in the Windows ME DosBox desktop,
LLF formatting the drive,
and writing the PSBBN Custom image
to the drive from Windows 7 dev machine

End result
(HDD support in OSDSYS, PSBBN, PS2 Linux)

  Also picked up were a Network Startup Disc and a DVD Player v2.10 disc. The former allows setting up a Network Adapter for usage with an internet connection, while the latter installs an updated version of the PS2's DVD Player application onto a memory card. Using the former, I was able to determine that my HDD Network Adapter does indeed work with respect to connecting to the internet, as well as setup the PS2 with an internet connection. The FHDB installation also showed the HDD interface to be working too. The latter pickup is mostly a curio item, which updates the PS2's DVD Player version. (My PS2 had its DVD Player software on v1.x, this updated it to v2.10). Most PS2 online games back in the day were hosted via GameSpy; however, when the website folded, so did all of the servers. Believe it or not, in 2018, it is still possible to play some games online, via reverse-engineered, dedicated servers.

   As far as games, I found copies of Star Wars Battlefront 1 & 2 for PS2 (the original games, not the terrible next-generation ones ruined by EA Games). A SWBF community member by the name of Phobos has recently put the finishing touches this summer on launching SWBFSpy, an OpenSpy replacement for the SWBF Master Servers. This will allow online multiplayer for these games once again, after applying patches to them, as well as gameplay stats and a plethora of other features, which haven't been around since the GameSpy servers ended. I'm quite excited for the release, and to play some SWBF online once again very soon!

 ----------------------------------------------------------------------------------------- 
GameCube Homebrew Exploit

    To quickly followup from Repairaganza last year, someone gave me a used Wii. It was fully functional, but the DVD Drive mechanism was jammed. It was determined that a copy of Mario Kart Wii was jammed in the drive. After prying the DVD out, the drive still wouldn't suck or eject discs. Although I attempted lubricating and adjusting the DVD drive's gear system after disassembly of the console, I was unable to repair the drive; the mechanism was just too fragile to fix up. During early 2018, I transplanted the working DVD Drive from my brother's dead Wii. This DVD Drive was an early D2A chip drive, and works perfectly in my Wii! As a bonus, it's an early enough disc drive revision that it can watch DVD movies through MPlayer for Wii (not that I want to reduce the lifespan of the ODD's laser by watching DVD movies).

  One item I was looking for the GameCube at the convention was a copy of any GCN game from the short list of exploitable GameCube games. Games from this list can utilize a hacked saved file, which will exploit the game into running unsigned code from another device (run boot.dol converted to a save file on the same GCN memory card, Mini DVD-R, SD Gecko, etc). An SD Gecko is a GCN Memory card which allows plugging in an SD Card. Such devices are widely use in the GCN homebrew scene for running games, apps, and other things on real hardware, but compatibility is better on smaller SD Cards (not SDHC cards). In order to setup the exploit, the user needs to copy the hacked saved file onto a GCN memory card through a hacked Wii, using a utility such as GCMM on the Wii. Unfortunately, I was unable to find any of those games (there was a copy of 007 Agent Under Fire, but it was case only; no game). I was hoping to get Swiss running on an SD Gecko, so I'd be able to run and play Gamecube hombrew on real hardware. Specifically, I was planning on running the Gameboy Inteface (GBI) homebrew app using the softmod. GBI is a GB(C)/Advanced emulator that utilizes the Gameboy Player hardware to play real cartridges, and has much superior emulation than that with the official Nintendo GBP Bootdisc. This would allow me to play old Gameboy games on the big screen, as well as allow for future streaming of retro games for Nerdology in glorious high quality.

   Fortunately, I found a very cheap copy ($3) of BMX XXX at Gamemaster's Realm. (No, I'm not interested in playing this mature game lol. Just using BMX XXX as an XXXPloit game). After ordering a cheap SD Gecko and recently acquiring an official Wii SD Card (1GB, so less than SDHC capacities). I was able to get Swiss and GBI running on my 'Cube through the Exploit 😎. I still have been having too many troubles with running homebrew that access external files, for whatever reason. Further details about this softmod in a future blog post/Nerdology video.

Running Swiss and GBI
through the BMX XXXPloit
via SDGecko
 -----------------------------------------------------------------------------------------  
Sega Saturn finds
   Some better finds at the convention were copies of Virtua Fighter 2 and Virtua Cop for the Sega Saturn. The latter came in a longbox (CIB minus manual), while the latter was a loose copy. The longbox game is the first for my Sega Saturn collection; I've only recently gotten around to collecting and playing on the Sega Saturn, after I repaired one last year.
----------------------------------------------------------------------------------------- 
Other EagleSoft Ltd News.

   EagleSoft Ltd has been relatively inactive the last 1.5 years, due to real life. Recently, this blog has been updated to use an HTTPS connection, in order to encrypt traffic for its own safety on the public web. Furthermore, the 100 blog post here at EagleSoft Labs, is coming very soon! I have a few surprises, announcements, and important web/blog updates for the incoming

-Tamkis

Ultra Air Hockey DX Source Code release!

Ultra Air Hockey DX
Source Code release!


 When Ultra Air Hockey DX v1.0 was released way back in February 2015 after completing Fundamentals of Software Engineering class in the Fall semester of 2014 at RMU, I had plans to eventually port the game to Android, and to then try to publish the game on Steam with achievements and online multiplayer. The Android port eventually surfaced in a v1.1 patch of the game in summer of 2015. However, due to many years passing since then and working on many other projects (including many now in an official video game development job with a company) and not having time for an online-multiplayer release, I am releasing the source code for the game today.

   In order to get the game on Steam, I would have to create original music (the music used in-game were module music from ModArchive.org, since the game was originally freeware), as well as figure out online multiplayer and Steam Achievements. This coupled with the fact that I would have to greatly refactor the game's code for online multiplayer and due to the fact the game was created with an ancient version of Unity (3.x or 4.x if I remember correctly), I am releasing the source code, as well as the game's documentation from Fundamentals of Software Engineering class. Everything is open sourced with a GPL License, and is free for people to use as per the license. Downloads available on the project page.

Enjoy!

-Tamkis

DreamPi NOOBS-compatible image release

DreamPi NOOBS-compatible
image release!

    Two years ago for my 24th birthday, I finally picked up a Sega Dreamcast, one of Sega's coolest and most innovative game consoles, which unfortunately was discontinued prematurely during its video game generation. It's still possible today to get a Sega Dreamcast online (even without a dial-up service available at a residency), to browse the web and send emails on DC-compatible web browsers, and even to play some online games again via resurrected private servers. The Sega Dreamcast comes supplied with a 56k dial-up modem; although a DSL Broadband adapter (the infamous "BBA") exists, it's quite rare and expensive (still so today). 

 Older attempts at getting my Dreamcast back online

    During that year, I tried getting my Dreamcast online by creating a Linux-based PC-DC server on my modern laptop. A PC-DC Server is a set of software that runs on a computer that converts a modern-day ethernet internet connection to something that dial-up based computers can use to connect to the internet. The software will answer to the dial-up calls from older computers, and convert the modern-day internet connection to a dial-up connection which the older device can use. My modern development machine just so happened to have a legacy v.92 Fax-modem port. Unfortunately, the modem model of my Dreamcast requires a voltage on the dial-up connection in order to function, so I soldered up a Line Voltage Inducer circuit. Although I tried running some Linux commands on a BunsenLabs Linux virtual machine to run a PC-DC server, I was only able to connect the Dreamcast to the internet for browsing; I was unable to get it to connect to private game servers. Often a connection attempt would be flaky, which was odd, and I suspected the LVI not to be soldered that well.

   Thinking the issue could be either hardware or setup related (especially with using a virtual machine), a year later I received from someone a very nice, used, older PC tower (a custom-built K8V SE Deluxe mo'bo in a ThermalIntake XTaser3 case). Always wanting a machine dedicated to playing old DOS and Windows 95-based titles, I installed Windows ME onto an HDD for the machine. Although ME does not have direct Real Mode DOS support out of the box (it's buried in the OS), it's possible to hack Real Mode DOS functionality back into the machine. More about this machine in an upcoming blog post or video. With the machine, I installed into it a v.92 US Robotics PCI card for dial-up connections, which would give a much more authentic dial-up connection for a PC-DC server. After installing the related software to setup a PC-DC server using the PCI dial-up modem (Windows 98 guide), I still was only able to browse the web, but not connect to games. At one point the modem card caused booting up of ME to not respond indefinitely, and, due to my usage of the particular Real Mode DOS hack I used ("Real Mode DOS Patch 3", which sacrificed emergency boot and Safe Mode functionality to use) and not having a working System Restore point (due to not having an update patch which fixes system restore failure issues past an odd Sept. 2001 date), I had to reformat the drive with a fresh Windows ME install. At this point I gave on trying to setup a PC-DC server via VM and dedicated DosBox for an online connection and decided to eventually purchase a DreamPi.

Physical Windows ME
DOSBox :)

DreamPi attempt

   A DreamPi is a standardized set of software (a customized Linux Distro) and a set of hardware created by a fellow named "Kazade" which will create a simplified DC-PC server. A DreamPi setup consists of a Raspberry Pi model 2/3 computer, a Linux-compatible USB Fax modem, an ethernet connection, and a Line Voltage Inducer. The software takes care of the dial-up connection with a very minimum, automated setup for the user, and will even allow the user to create an account for the DreamPi on the Dreamcast Now website. The Dreamcast now website will show the usernames of players currently online with DreamPis, and which online compatible game they are playing, allowing for easy hooking up with people for online matches. DreamPi by extension can also get other dial-up based computers back online, including the Sega Saturn, which can browse the restored NetLink zones for NetLink compatible games (Saturn guide). One problem with the DreamPi Linux distro is that it is a raw image file, meant to be written directly to the SD Card, making it quite unsuitable for allowing multi-booting of various OSes on the same SD Card.

 DreamPi Kit

DreamPi NOOBS-compatible image

    To fix this problem, I have released a NOOBS-compatible DreamPi image, based off DreamPi v1.6. NOOBS (New Out-Of Box Setup) is a bootloader for Raspberry Pi, that allows the installation of multiple OSes in such a way as to allow multi-boot. This DreamPi image works with NOOBS, and has a nifty slideshow upon installation explaining the features of DreamPi. By extension, this image is compatible with PINN. PINN (PINN Is Not NOOBS) is an enhanced version of NOOBS, which I recommend over using NOOBS. It has the following extra features over standards NOOBS:
  • Various ways to install OSes
  • Install from SD Card (offline)
  • Install from online server (with a wider variety of OSes)
  • External Media
    • USB Flash Drive
    • External SD Card via a USB SD Card reader
  • Install additional 512MB ext4 Data partitions, for general data usage
  • Download and archive to the SD Card the OSes from the online server, for offline installation
  • Easily reinstall OSes if something goes wrong (without having to redo a fresh NOOBS/PINN setup)
  • Various maintenance capabilities
    • OS maintenance utility
    • Recovery shell
    • SD card clone utility
    • Password restorer
    • File System Checker
  The image can be downloaded on its page in the Sega Dreamcast section of my website, along with info about it and how to use it. With my DreamPi, I was finally able to get my Dreamcast and Saturn back online for web browsing, and to get the Dreamcast back online for gaming! Couple with my NOOBS-compatible image, I was able to get a few other Linux distros working on the same SD card with a multi-boot setup.


Installing and using
DreamPi NOOBS compatible image

Installation slideshow
 

Some pictures of getting my
Dreamcast back online with DreamPi :)
 Getting my Sega Saturn
to browse the web with DreamPi
 Enjoy this DreamPi NOOBS compatible image for getting your Dreamcast/other dial-up computers back online, while enabling multiboot for other Linux distros!

-Tamkis
Copyright EagleSoft Ltd. Powered by Blogger.